Open CASCADE Technology  6.8.0
Workshop Organisation Kit

Table of Contents

DEPRECATION WARNING

Please note that this document describes use of WOK as comprehensive build system. This use is outdated, and WOK is to be removed in one of the future OCCT releases.

Currently only a small subset of WOK capabilities described in this document is actually necessary for building OCCT. See Using WOK for a more practical guide.

Introduction Glossary

About the Development Environment

Open CASCADE Technology (OCCT) development environment is able to accommodate large numbers of developers working on a variety of products. Within this environment developers can produce multiple versions of products for various hardware and software platforms, including versions corresponding to particular marketing requirements. At the same time, OCCT development environment enables the maximum possible reuse of software components. In other words, OCCT development environment is designed to facilitate industrial scale development.

Brief Overview of Open CASCADE Technology Development Environment

The following diagram shows OPEN CASCADE tools and resources, the development method, and the architecture of applications that you can develop with Open CASCADE Technology.

wok_image005.png
Schematic View of OCCT Development Platform
The application developer goes about creating his application by editing his source code and producing the final application using a set of intelligent construction tools. These tools are available within a structured development environment called the software factory.

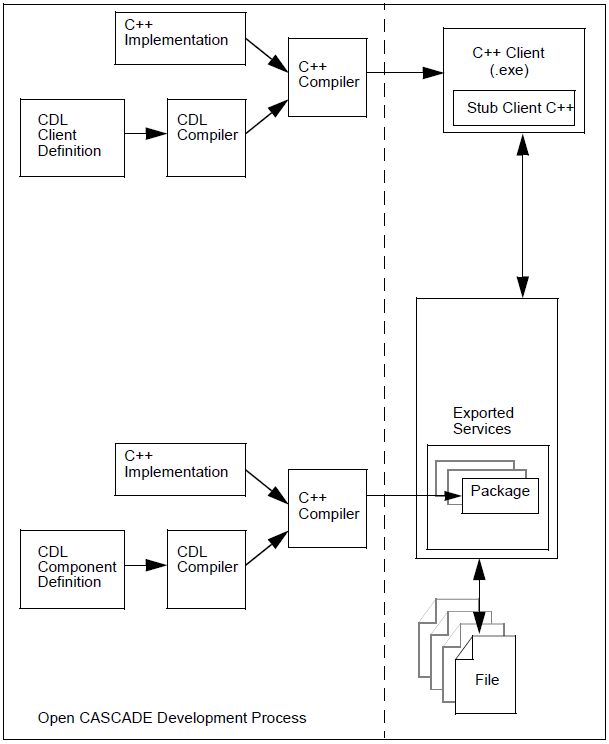
The developer defines new software components in CDL, Component Description Language, and uses a CDL compiler to derive their C++ implementations. These components are then compiled into packages.

WOK Components

Entities

The WOK environment is made up of entities, for example software factories and development units. A full list of WOK entities is provided in the Glossary section.

Files

WOK manages two different types of files: user source files and WOK administration files. To support this, each entity has a home directory, which contains its administration directory. This is called adm and stores the administration files that WOK needs. In addition development units have a source directory called src, which contains both .cdl and .cxx source files, and a header file directory called inc, which contains .hxx files.

Glossary

Development Units

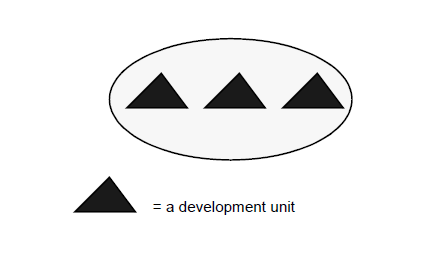
A development unit is the smallest unit that can be subject to basic development operations such as modifying, compiling, linking and building. The following list contains all types of development units. The letter in parentheses indicates the letter key by commands such as ucreate and umake. In the rest of the manual, this letter key is referred to as the short key.

  • package (p) A set of related classes and methods along with their CDL definitions.
  • schema (s) A set of persistent data types.
  • executable (x) An executable is used for unit and integration test purposes. It is based on one or more packages.
  • nocdlpack (n) A package without a CDL definition. Used for low-level programming or for incorporating foreign resources.
  • interface (i) A specific set of services available for wrapping (an interface contains packages, classes, and methods).
  • jni (j) A development unit used to wrap C++ classes to Java. It is based on one or more interfaces.
  • toolkit (t) A set of packages. Useful in grouping packages together when there is a large number of packages based around a particular subject.
  • delivery (d) A development unit for publishing development units.
  • resource (r) A development unit containing miscellaneous files.

Workbenches

A workbench is a specialized directory structure where the user creates, modifies, and uses development units. A workbench is likely to be the personal property of one user or at most a small team of developers.

wok_image006.png
Schema of a Workbench Containing three Development Units

Workshops

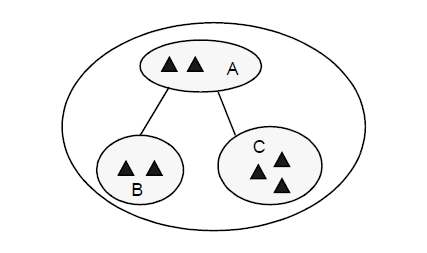
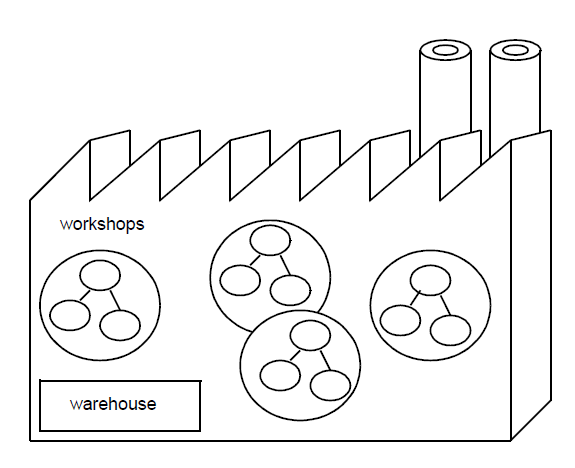
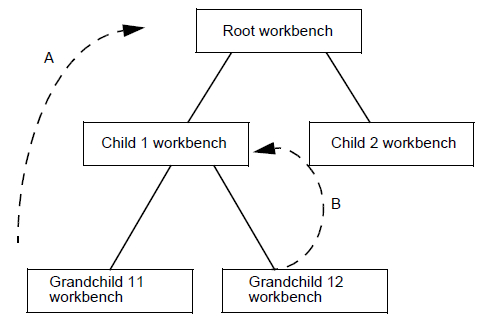
A workshop is a tree of workbenches. It provides the development team with an independent workspace inside which the complete cycle of software production can be carried out. The root workbench is in a valid state and contains the working versions of the development units. Development units in a root workbench are visible in its child workbenches.

For example, the schema below shows a workshop containing three workbenches. Workbenches B and C are the children of workbench A. Development units in A are visible in both B and C

wok_image007.png
Workbenches
Workshops are fully independent of each other. They are organized in such a way that development units can be grouped into a delivery and placed in a warehouse. Communication between workshops is carried out by means of these deliveries. A warehouse belongs to a factory and is visible from all workshops in that factory. In this way, development units can be shared between a group of development teams.

wok_image008.png
Two Workshops Delivering and Borrowing Parcels

Factories

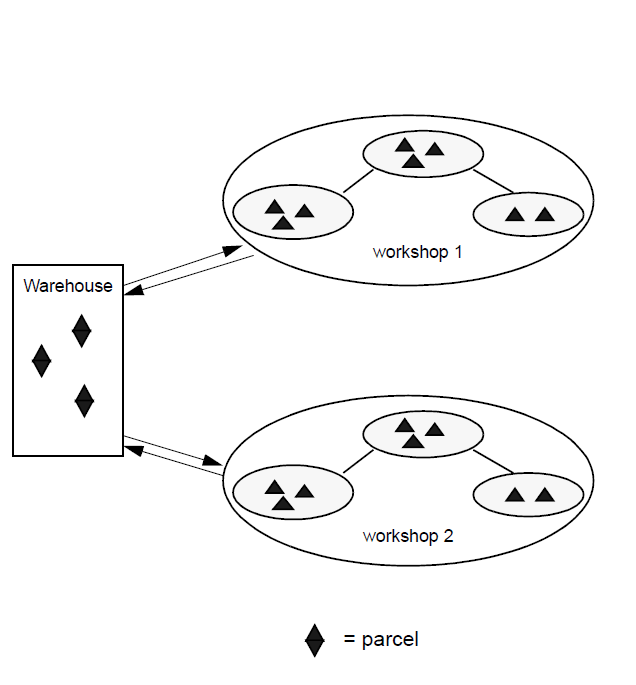
A factory is a set of workshops and their corresponding warehouse. There is a single warehouse in any factory. The continuous upgrading and improvement of a product is carried out in a specific factory. To create a new version of an application within the factory, you establish a new workshop dedicated to creation and support of the new version.

wok_image009.png
Factory Contains Workshops and Warehouse

Elements of the Platform

Development Units

A development unit is the basic element of WOK development. It includes the following three entities:

  • A directory structure (a minor component)
  • Source files, also called primary files
  • The result of the build process (compilation, etc.), also called derived files.

Directory Structure of a Development Unit

The directory structure of a development unit consists of a tree of directories, which are created when the development unit is initialized. Refer to the Workbenches section for further details on the workbench structure.

Files in a Development Unit

Source Files

Source files are written by the developer in the source section (the src directory) of the development unit. Each development unit maintains the description of its own source files, and this description is stored in one or more files within the src directory. The details of how the description is stored vary according to development unit type as shown below:

  • package (p) The names of all source files are worked out from the CDL description, following the conventions described in the C++ Programming Guide. This list of files can be supplemented by additional files listed in the file called FILES. This file must be stored in the unit’s src directory. Whenever header files are included in the src directory of a development unit, they must be specified in FILES so that the C++ preprocessor will take them into account. This reduces compilation time by 10 to 40 percent.
  • schema (s) No description of the source files is needed. There is a single source file: schema.cdl.
  • executable (x) The names of all source files are worked out from the CDL description. The format of this file is described in the Building an Executable section.
  • nocdlpack (n) The list of source files is contained in the FILES file stored in the unit’s src directory. interface (i). No description of the source files is needed. There is a single source file: interface.cdl.
  • jni (j). No description of the source files is needed. There is a single source file: jni.cdl.
  • toolkit (t) The description is given by the file called PACKAGES which is stored in the unit’s src directory. FILES must also exist in this directory, and must include PACKAGES in its list of files.
  • delivery (d) The description is given by two files stored in the unit’s src directory: FILES and a file called COMPONENTS. FILES must include COMPONENTS in its list of files.
  • resource (r) A resource unit is used in a delivery. FILES contains a list of the unit’s files, one per line in the following format: atype\:\:\:afilename Here, filename is the name of a file, which the compiler will look for in the src directory of the unit, and atype is a WOK type. To display a list of all available WOK types, use the command: wokinfo -T.

Derived files

Derived files created by compilation are automatically placed in the derived section of the development unit. These may be executable files or archives of compilation results.

Package

A package is a development unit that defines a set of classes, which share a number of common features such as similar data structure or a set of complementary algorithmic services. Packages help to manage creation and the use of large hierarchies of software components. To create a package, you write a .cdl file describing it in the src directory of the package development unit. The description includes classes and global methods, which comprise it. Each class is also described in a separate .cdl file. The package .cdl file also lists the packages used in the specification of its classes and methods. C++ implementation files are also stored in the src subdirectory of the package development unit. These implementation files are:

  • .cxx for an ordinary class
  • .lxx for any inline methods
  • .pxx for any private declarations
  • .gxx for a generic class

To create the Development Unit structure for a package use the following syntax:

ucreate –p MyPackage

The package description has the following CDL syntax:

package PackageName
[uses AnotherPackage {‘,’ YetAnotherPackage}]
is
[{type-declaration}]
[{package-method}]
end [PackageName]’:’

For example:

package CycleModel
uses
Pcollection
Tcollection
BREpPrimAPI
TopExp
Geom
Pgeom
is
deferred class Element;
class Wheel;
class Frame;
class LocalReference;
Adjust(awheel: wheel from CycleModel;
  aframe: Frame from CycleModel);
end CycleModel;

For full details on the CDL syntax, refer to the CDL User’s Guide.

Schema

A schema is a development unit that defines the set of all data types, which your application is likely to need in order to read and write files. Such data types are persistent.

To create a schema, write a .cdl file that lists all the packages, which contain all persistent data types used by the application. Note that only persistent classes are taken into account during compilation; transient classes are ignored.

Note that you don’t have to put dependencies in all packages and classes. You only have to write the highest level dependencies. In other words, the uses keyword in the schema file allows you to list packages. Any package similarly listed in the package files for these packages are also incorporated into the schema.

To create the Development Unit structure for a schema use the syntax below:

ucreate –s MySchema

The schema description has the following CDL syntax :

schema SchemaName
is
ListOfPackagesContainingPersistentClasses;
ListOfPersistentClasses;
end;

For example:

schema MyCycleSchema
is
class Wheel from package CycleModel;
class Frame from package CycleModel;
..
class Spanner from package CycleTools;
end;

For full details on the CDL syntax, refer to the CDL User’s Guide.

Executable

The purpose of an executable is to make executable programs. The executable can use services from one or more packages and is described in a .cdl file as a set of packages.

To create an executable, you write one or more MyExe.cxx files in the src subdirectory of the unit. This file will contain the main function. Then it is possible to compile the executable.

To create the Development Unit structure for an executable, use the syntax below:

ucreate –x MyExec

The executable description has the following CDL syntax:

executable ExecName
is
executable BinaryFile
uses
LibFile as external
is
C++File;
end;
end;

For example:

executable MyExecUnit’
is
executable myexec
uses
Tcl_Lib as external
is
myexec;
end;
executable myex2
is
myex2;
end;
end;

For full details on the CDL syntax, refer to the CDL Reference Manual.

Toolkit

A toolkit is a development unit that groups a set of packages to create a shareable library. An example of a toolkit is the ModelingData module. Toolkits serve for the following purposes:

  • Linking of large numbers of packages
  • Faster loading of executable files that use toolkits such as test files.

A toolkit has no CDL definition. Creating a toolkit involves writing a PACKAGES file in the src subdirectory of its development unit. This file lists all the packages needed in the toolkit. You then create a definition of this file to the FILES.

You then compile the toolkit to create a shareable library.

Nocdlpack

A nocdlpack is a development unit that has no CDL definition. It is compiled directly from source files written in C, C++, Fortran, or in sources to be treated by the lex or yacc tools. A nocdlpack is useful when you write a low-level interface with another product, for example, a network application.

To define a nocdlpack, you create a file called FILES in the src subdirectory of the nocdlpack development unit. In this file, you list the Fortran, C, C++, lex, and yacc files that compose the pack. You list the files one per line.

On compilation, the result is a shareable library.

Interface

An interface is a development unit that defines a set of services available for wrapping into Java. An interface is defined in a .cdl file as a list of packages, package methods, classes, and methods. It makes these available to a jni unit.

To create the Development Unit structure for an interface, use the syntax below:

ucreate -i MyInterface

The interface description has the following CDL syntax:

interface InterfaceName
is
ListOfPackages
ListOfClasses
ListOfMethods
end;

For example:

interface MyInterface
is
        package TopoDS;
        class Shape from ShapeFix;
end ;

Jni

A jni is a development unit that wraps declared services into Java using JNI (Java Native Interface).

A jni creates Java classes that are used as C++ counterparts when developing in Java.

To create the Development Unit structure for an Jni, use the syntax below: ucreate -j MyJni

The interface description has the following CDL syntax:

client JniName
is
{interface InterfaceName;}
end;

For example :

client MyJni
is
        interface MyInterface;
        interface MyAnotherInterface;
end ;

Delivering Parcels

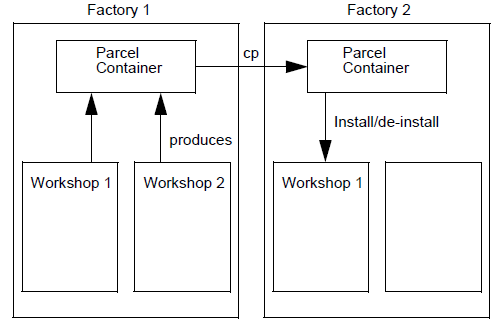
The delivery process allows creating parcels. These parcels group together the development work done within a given workshop. You can ship these parcels to other workshops called client workshops.

A delivery is autonomous. Once the delivery development unit is compiled, a parcel is stored in the factory warehouse and has no more connection with the workshop where it was created. A parcel has its own directory structure.

All Open CASCADE Technology resources are seen as parcels.

wok_image010.png
Parcels
You create a delivery unit under a specified workbench.

You are strongly advised to create delivery units under the root workbench of the workshop. Child workbenches could be deleted in the future, whereas the root workbench is likely to remain untouched. In other words, you safeguard the delivery by creating it in the root workbench.

Note If you do not specify a workbench when you make a delivery, it is created under the current workbench.

Workbenches

A workbench is generally the place where one particular developer or a team of developers works on a particular development. A workbench is composed of a public part and a private part.

Roots

The following roots are used in the structure of a workbench:

  • Home Workbench root containing various administration files of the workbench.
  • Src Root of the workbench sources, which facilitates the integration into WOK of version management software such as CVS.
  • DBMS Root of the derived files dependent on the extraction profile (.hxx, _0.cxx files, etc.).
  • DBMS_Station Roots of the derived files dependent on the extraction profile and on the platform (.o, .so files, etc.).

Roots are defined for each profile and platform supported by the workbench. For example, a workbench supporting the DFLT profile on Sun and SGI platforms has the following roots:

  • Home Workbench root,
  • Src Root of the source files,
  • DFLT Root of the derived files,
  • DFLT_sun Root of the files built on Sun platforms,
  • DFLT_sil Root of the files built on SGI platforms,

For a workbench additionally supporting ObjectStore, the following additional roots are also found: OBJS, OBJS_sun, OBJS_sil.

These roots are defined in the workbench definition file MyWorkbench.edl as the parameter %MyWorkbench_RootName.

Note that default values help to define various roots.

Directories

Under each root, a hierarchy of directories allows to store various files.

  • Under the Home root are found:
    • work, the private workbench directory reserved for the developer
    • Adm, the directory reserved for administration files.
  • Src contains:
    • src/MyUD, the directory containing the source files of the development unit MyUD.
  • DBMS contains:
    • inc, containing the public header files of the workbench UDs
    • drv/MyUD, containing the private extracted files of MyUD
    • drv/MyUD/.adm, containing the administration files dependent on the extraction profile
    • drv/MyUD/.tmp, containing the temporary files dependent on the extraction profile.
  • DBMS_Station contains:
    • *<station>/lib* with all the libraries produced in the workbench
    • *<station>/bin* with all the binaries produced in the workbench
    • *<station>/MyUD* with all the station dependent files which are private to the development unit such as objects
    • *<station>/MyUD/.adm* with all the station dependent administration files
    • *<station>/MyUD/.tmp* with all the temporary files constructed in the development unit.
wok_image011.png
Structure of the workbench Mywb

Workshops

A workshop is an independent workspace inside which the complete cycle of software production is carried out. Workbenches inside a workshop are organized so that development units can be shared either by being published in a father workbench or by being placed in reference in the root workbench.

wok_image012.png
Visibility between Workbenches in a Workshop
In this image:

  • A is the development unit A from Grandchild 11 placed in reference in root. It is visible throughout the workshop.
  • B is the development unit B from Grandchild 12 published in ancestor Child 1. It is visible to Child 1, Grandchild 11 and Grandchild 12.

In a large-scale development that involves one or more teams of developers, you should decide how you are going to structure a workshop right at the beginning. If need be, you can review your decision later.

An existing workshop can be duplicated and the original workshop can be used as the basis for maintaining the present version of a product. The new workshop can then be used to develop and maintain a new version of the product.

When creating a new workshop, you specify - in the form of parcels – which resources are to be available within the workshop.

Factories

A factory contains a number of workshops and a warehouse. When Open CASCADE Technology is installed, the system administrator creates a single factory. This contains a single workshop as well as the warehouse containing OCCT resources in the form of parcels.

There is no theoretical limit to the number of workshops that can be added to a factory. However, a single factory should be enough.

Development Process

WOK Environment

The WOK interface is based on tcl, a command language provided by the Regents of the University of California and Sun Microsystems, Inc. The WOK development environment is in fact a tcl session.

Before you run a tcl session you must make sure that your account is configured for using tcl, see the Configuring Your Account for Tcl and WOK section.

To start a tcl session use the command:

% tclsh

Within this session, all WOK commands are available as well as standard tcl commands. You can also use tcl language extensions, if these are installed. To exit from a tcl session use the command:

<blockquote>
exit
</blockquote>

Online help is provided with tcl. To access this, use the following command:

% tclhelp

Online help is also available for all WOK commands. To display help on a particular WOK command, give the command name followed by the -h flag, as in the following example:

<blockquote>
wokcd -h
</blockquote>

Steps

Implementation of an application is based on the following steps:

  1. Enter the software factory using the command wokcd MyFactory
  2. Enter a workshop using the command wokcd MyWorkshop
  3. Open a workbench using the command wokcd MyWorkbench
  4. Search for the data types required among the existing OCCT libraries
  5. Define one or more packages which will contain the classes
  6. Define new data types as classes
  7. Implement the methods of those classes in C++
  8. Implement any package methods in C++
  9. Unite the test packages
  10. Define any nocdlpacks (if any)
  11. Test the components

Note: Steps 1-3 can be performed with a single WOK command:

<blockquote>
wokcd MyFactory:MyWorkshop:MyWorkbench
</blockquote>

Getting Started

Testing an Executable

Before you start, the following restrictions on WOK entity names must be noted:

  • Entity names may only contain alphanumeric characters and dashes.
  • Entity names must be unique within a hierarchy. For example, you must not have two workbenches called MyBench in the same Workshop. Likewise, you may not have a workshop called CSF in a factory of the same name.
  • Do not use upper and lower case characters to distinguish between two entity names, for example ENT1 and eNt1. This restriction is for reasons of portability.
  • Parcel names must be unique.

Entering the Factory

When you start work you go to the factory using the following command:

<blockquote>
wokcd <MyFactory>
</blockquote>

Creating a Schema

If you don’t want to work in a workshop already present in the factory, you can create a new one. To do this, use the following command:

<blockquote>
screate –d <MyWorkshop>
</blockquote>

This creates the new workshop MyWorkshop in the current factory. To create the same workshop in a different factory use the syntax below:

<blockquote>
screate –d <MyFactory:MyWorkshop>
</blockquote>

When you create a new workshop, it is empty.

Selecting Parcels

When you create a workshop, you select existing OCCT resources, for example, parcels, to use in it. To do this, you create the workshop and add the parcels using the following syntax:

<blockquote>
screate –d <MyWorkshop> -DparcelConfig=Parcel1,Parcel2…
</blockquote>

To display available OCCT resources, in other words, to see what parcels are available, you use the following command:

Winfo –p <WarehouseName>

Note: parcel configuration rarely needs to change. If it does, only the workshop administrator should make them.

Opening a Workshop

To open a workshop, you use the following command:

<blockquote>
wokcd <MyWorkshop>
</blockquote>

Creating a New Workbench

When you create a new workshop, it is empty. In other words, it does not contain any workbenches. To create the root workbench of a new workshop, you use the following command:

<blockquote>
wcreate -d <MyWorkbench>
</blockquote>

This creates a tree of workbench subdirectories. If workbenches already exist in your workshop, but you do not want to work in any of these, create a new workbench as a child of an existing one. You do this using the following syntax:

<blockquote>
wcreate –d <MyWorkbench> -f <ParentWorkbench>
</blockquote>

Opening a Workbench

To open a workbench, you use the command below:

<blockquote>
wokcd <MyWorkbench>
</blockquote>

This automatically takes you to the root directory of the workbench

Using Existing Resources

Before creating new data types, you should look for existing components that you can reuse. In particular, you should look through the existing resources of your Open CASCADE Technology platform to see if any of the required components already exist, or if any existing generic components can be suitably implemented. This search can be conducted using the online documentation. You should note the packages and classes, which you can reuse.

Creating Software Components

Creating a Package

To develop new software components, you usually need to create one or more packages. You do this, by using the following command:

<blockquote>
ucreate –p <MyPackage>
</blockquote>

Because the key -p defines the default value for the ucreate command, you do not need to specify it. The following syntax, for example, will also create a package:

<blockquote>
ucreate <MyPackage>
</blockquote>

Enter a Package or other Development Unit Structure

Enter the package or any other development unit structure using the wokcd command as in the syntax below:

<blockquote>
wokcd MyPackage
</blockquote>

The current directory is now:

MyWorkbenchRoot/src/MyPackage

Writing the Package and Class Specifications in CDL

Write the descriptions of the software components in CDL using an editor of your choice. Write each class in its own .cdl file and write one .cdl file (MyPackage.cdl) to specify the package that contains those classes.

CDL Compilation of the Package

Compile and check the package and its classes using:

<blockquote>
umake –e xcpp
</blockquote>

This command also extracts the C++ header files (.hxx) and stores them in the derived files directory.

Implementing Methods in C++

A package will contain methods, which may be:

  • Instance methods
  • Class methods
  • Package methods. Extract prototypes for the C++ methods using the following command:
    <blockquote>
    umake -o xcpp.fill -o xcpp.template
    </blockquote>

You should not confuse this syntax with the template feature of C++ used to implement the genericity. The umake -o xcpp.template command creates a skeleton C++ file for:

  • Each class
  • All the package methods. The packages methods will be created in a file called package.cxx.template. This command is not included in the umbrella command MyPackage. You will need to use an editor to implement these methods in C++.

Compiling the Package

To compile the package, use the command:

<blockquote>
umake -o obj <MyPackage>
</blockquote>

If you do not specify a package, the current development unit is compiled.

Sample Construction of a Package

In the following example a workbench named MyWb is created as a child of an existing workbench Topo. MyWb is used for working on the package MyPack. Commands preceded by an asterisk below are used only once per session:

  1. Create the MyWb workbench as a child of Topo.
    <blockquote>
    wcreate MyWb -f Topo -d
    </blockquote>
  2. Create MyPack in MyWb.
    <blockquote>
    ucreate MyPack    
    </blockquote>
  3. Move to the source directory of MyPack.
    <blockquote>
    wokcd MyPack
    </blockquote>
  4. Edit the source files (MyPack.cdl etc.). You do this outside tcl, using the editor of your choice.
  5. Start the extraction of MyPack.
     > umake -e xcpp
  6. Generate the .cxx templates for MyPack: MyPack.cxx.template
       > umake -o xcpp.fill -o xcpp.template -t
  7. Edit the source files (MyPack.cxx etc). You do this outside tcl, using the editor of your choice.

Note that umake command used without arguments will carry out all the above umake steps. You can also use it with specific arguments as above to go through the development process step by step.

Package Files

  • Primary Files for a Package
    • <Package>.cdl Primary package file.
    • <Package>_<Class>.cdl Primary class file.
  • C++ Files for a Package
    • <Package>.cxx Primary package source file.
    • <Package>_[1..9[0..9]*].cxx Secondary package source files.
    • <Package>.lxx Inline package methods source file.
    • <Package>.pxx Private instructions source file.
  • C++ Files for a Class
    • <Package>_<Class>.cxx Primary class source file.
    • <Package>_<Class>_[1..9[0..9]*].cxx
  • Secondary class source files.
    • <Package>_<Class>.gxx Generic class methods source file. This is an alternative to the .cxx file(s), you do not have both.
    • <Package>_<Class>.lxx Inline methods source file.
    • <Package>_<Class>.pxx Private instructions source file.
  • Derived C++ Files for a Package
    • <Package>.hxx User header file.
    • <Package>.ixx User header file included in <Package>.cxx.
    • <Package>.jxx User header file included in <Package>_[1-9].cxx.
  • Derived C++ files for a class
    • <Package>_<Class>.hxx User header file.
    • <Package>_<Class>.ixx User header file included in <Package>_<Class>.cxx.
    • <Package>_<Class>.jxx User header file in <Package>_<Class>_[1..9[0..9]*].cxx.
    • Handle_<Package>_<Class>.hxx Persistent or Transient class header file.
    • <Package>_<Class>_0.cxx For instantiated classes.

Umake Steps for a Package

The umake steps for development units of package type are explained below.

  • src Processes the file MyPackage.cdl to generate a list of all the CDL files in the development unit. Processes FILES to list source files.
  • xcpp.fill Compiles the internal data structure to prepare for subsequent extractions.
  • xcpp.src Lists the source files (.cxx, .gxx, .lxx) deduced from the CDL files.
  • xcpp.header Extracts header files for the classes in the development unit.
  • xcpp.template Extracts a template for implementation of methods. (Hidden step.)
  • obj.inc     Based on the list of source files generated by the src and xcpp.src steps, this step publishes the include files for the development unit so that other units can use them.
  • obj.cgen Processes the source files to generate code.
  • obj.comp   Compiles each file that can be compiled.
  • obj.idep     Generates dependency information for the unit. This comprises:
    • Includes performed by unit compilation (Unit.MakeState)
    • Implementation dependencies in terms of the unit suppliers (Unit.ImplDep)
  • obj.lib    Generates the shared library for the development unit.

Creating a Nocdlpack

If your executable requires the use of a nocdlpack, create a development unit of nocdlpack type and move to its structure using the commands below:

<blockquote>
ucreate -n <MyNoCDLPack>
wokcd <MyNoCDLPack>
</blockquote>

Use an editor to write FILES, which is a nomenclature file for a nocdlpack. This file must list all the C, C++, Fortran, lex, and yacc sourcs files (one per line). Build the nocdlpack using the following command:

<blockquote>
umake [<MyNoCDLPack>]
</blockquote>

Note that a nocdlpack unit is not intended to perform tests. Use an executable unit instead.

Sample Construction of a Nocdlpack

In the following example a nocdlpack MyNocdlpack, is created. Commands preceded by an asterisk below are used only once per session:

  1. *Create MyNocdlpack in MyWb.
    <blockquote>
    ucreate -n <MyNoCDLPack>
    </blockquote>
  2. Move to the source directory of MyNocdlpack.
    <blockquote>
    wokcd <MyNoCDLPack>
    </blockquote>
  3. Write the FILES list. You do this outside tcl, using the editor of your choice.
  4. Write the source code.
  5. Build MyNocdlpack.
    <blockquote>
    umake [<MyNoCDLPack>]
    </blockquote>

Umake Steps for a Nocdlpack

The umake steps for development units of nocdlpack type are explained below.

  • src   Processes FILES to list source files.
  • obj.cgen Processes the source files to generate code.
  • obj.inc Based on the list of source files, this step publishes the header files for the unit so that other units can use them.
  • obj.comp Compiles each file that can be compiled.
  • obj.idep Generates dependency information for the unit. This comprises:
    • Includes performed by unit compilation. (Unit.MakeState)
    • Implementation dependencies in terms of the unit suppliers. (Unit.ImplDep)
  • obj.lib Generates the shared library for the unit.

Creating a Schema

If the application, which you intend to build, stores data in a file, you need to define a schema for the persistent data types that are known.

You create a schema and go to its root directory using the commands:

<blockquote>
ucreate -n <MySchema>
wokcd <MySchema>
</blockquote>

Using the editor of your choice, write a .cdl file to define the schema. This schema file lists all the packages that contain persistent data types used in the implementation of your application. It has the following format:

schema MySchema
is
class <MyClass> from <Package>;
end;

Building a Schema

Compile and check the coherence of the CDL specification for the schema:

<blockquote>
umake -e xcpp.fill
</blockquote>

Extract the C++ description:

<blockquote>
umake -o xcpp
</blockquote>

Compile the C++ description of the schema:

<blockquote>
umake -o obj
</blockquote>

Alternatively, the above three steps can all be carried out by one command:

<blockquote>
umake
</blockquote>

Sample Construction of a Schema

In the following example the schema MySchema is created. It contains all the schemas of the persistent classes of your own packages and the packages they depend on. Commands preceded by an asterisk below are used only once per session:

  1. Create MySchema in MyWb.
    <blockquote>
    ucreate -s MySchema
    </blockquote>
  2. Move to the source directory of MySchema.
    <blockquote>
    wokcd MySchema
    </blockquote>
  3. Edit the source file MySchema.cdl. You do this outside tcl, using the editor of your choice.
  4. Derive implementation files.
    <blockquote>
    umake -e xcpp.sch
    </blockquote>
  5. Derive application schema files.
    <blockquote>
    umake -o xcpp.ossg
    </blockquote>
  6. Compile the schema.
    <blockquote>
    umake -o obj
    </blockquote>

Schema Files

  • Primary Files for a Schema
    • *<Schema>.cdl* Primary schema file.
  • Derived C++ Files for a Schema
    • *<Schema>.hxx* User header files.
    • *<Schema>.cxx* Schema implementation files.
    • *<Sch_MyPack_MyClass>.cxx* Schema implementation files.

Umake Steps for a Schema

The umake steps for development units of schema type are explained below.

  • src        Processes MySchema.cdl to generate a list of CDL files for the development unit. Processes the FILES file to list source files.
  • xcpp.fill  Compiles the internal data structure to prepare for subsequent extractions.
  • xcpp.sch   Extracts the schema implementation code.
  • obj.comp   Compiles the extracted files that can be compiled.
  • obj.lib    Generates the shared library for the unit.
  • obj.idep   Generates dependency information for the schema.

Building an Executable

Creating an Executable

To make an executable from one or more of the packages, which you have created, write a .cdl file to specify the packages to use.

Writing an Executable

Refer to the CDL User’s Guide for full details. A simple example is given below.

executable <MyExec> // the executable unit
is
executable myexec // the binary file
uses
Tcl_Lib as external
is
myexec; // the C++ file
end; // several binaries can be specified in one .cdl file.
executable myex2
is
myex2;
end;
end;

Write the C++ file(s). For the example above you write two files: myexec.cxx and myex2.cxx.

Building the Executable

To build the executable, use the command umake

Construction of an Executable

In the following example an executable, MyExec, is created in the workbench MyWb. Commands preceded by an asterisk below are used only once per session:

  1. *Create MyExec in MyWb.
    <blockquote>
    ucreate -x MyExec
    </blockquote>
  2. Move to the source directory of MyExec.
    <blockquote>
    wokcd MyExec
    </blockquote>
  3. Edit the cdl source file MyExec.cdl. You do this outside tcl, using the editor of your choice.
  4. Edit the C++ files AnExe.cxx, etc. You do this outside tcl, using the editor of your choice.
  5. Build MyExec.
    <blockquote>
    umake
    </blockquote>
  6. Run the executable file.
    <blockquote>
    wokcd -PLib
    MyExec
    </blockquote>

Executable Files

| <Exec>.cdl | Primary executable file | | <AnExe>.cxx | Source C++ file | | <AnExe>_[1-9].cxx | Other source C++ files |

Umake Steps for an Executable

The umake steps for development units of executable type are explained below.

  • src Processes MyExe.cdl to generate a list of CDL files for the development unit. Processes FILES to list source files.
  • src.list Based on MyExe.cdl, works out the list of parts and the source files involved for each part.
  • exec.comp Compiles the files that can be compiled for each part of the executable.
  • exec.idep Generates dependency information for each part of the executable.
  • exec.libs Computes full implementation dependency to prepare for linking for each part of the executable.
  • exec.tks Performs toolkit substitution according to TOOLKITS for each part of the executable.
  • exec.link Links each part of the executable.

Test Environments

Testing an Executable

To test an executable, you create an executable development unit and move to its structure.

When you write the .cdl file for your test executable, specify the packages to test, for example:

executable MyTest // the executable unit
is
executable mytest1 // the binary file
is
mytest1; //the C++ file
end; // several binaries can be specified in one .cdl file.
executable mytest2
is
mytest2;
end;
end;

Write the C++ test file(s), in the example, mytest1.cxx and mytest2.cxx.

Building the Executable

To build the executable use the command:

<blockquote>
umake
</blockquote>

Setting up a Test Environment

To set up a test environment, move to the /drv subdirectory that corresponds to the current profile (e.g. /MyExec/drv/DFLT/sun) and run the executable test file.

<blockquote>
wokcd -PLib
wokenv -s
myApp
</blockquote>

The command wokenv is used with -s option to configure the test environment. The command wokenv –s uses the current workbench to decide what actions are needed to configure the tcl shell for use as your test environment. WOK sets the following environment variables:

  • $STATION - The current station.
  • $TARGET_DBMS - The current database platform.
  • $PATH - The current path, plus the bin directories of the parcels.
  • $LD_LIBRARY_PATH The current path, plus the lib directories of the parcels. WOK then sets a variable for each parcel listed in the parcel configuration of the current workshop. This variable is the original name of the delivery unit in the uppercase, with the suffix HOME.
  • $ORIGDELIVUNITHOME is set as the root directory of the parcel. WOK then sources the following files:
    • MyFactory.tcl, found in the admin directory of the factory.
    • MyWorkshop.tcl found in the admin directory of the workshop. Then for each Workbench, WOK sources according to the hierarchy of the workbenches:
    • Workbench.tcl, found in the /Adm directory of the workbench.

After the environment is set up, you are at a C shell prompt and can run the executable.

Note Environment variables are only set when the command is used with the option -s. Thus, if you change a workbench or a factory within WOK and then return to the test environment you must use wokenv -s to ensure that the set environment variables configuration is correct for the current WOK state. The configuration actions that WOK performs can be written to a file and saved as a script. You can then edit this script to suit it to your own needs, and generate a personalized test environment.

To create the script file use the following command:

<blockquote>
wokenv -f <ScriptFile> -t csh
</blockquote>

This command generates a file, ScriptFile, which configures a C shell to mirror the current WOK environment. An example script file is given below.

setenv STATION *sil*
setenv TARGET_DBMS *DFLT*
setenv KERNELHOME */adv_22/WOK/BAG/KERNEL-K1-2-WOK*
setenv LD_LIBRARY_PATH */adv_22/WOK/BAG/wok-K1-2/lib/sil:/adv_22/WOK/BAG/KERNEL-K1-2-WOK/sil/lib/*
setenv PATH */usr/tcltk/bin:/usr/bin:/bin:/usr/bin/X11:/lib:.:/SGI_SYSTEM/util_MDTV/factory_proc:/adv_22/WOK/BAG/KERNEL-K1-2-WOK/sil/bin/*
source /adv_22/WOK/BAG/KERNEL-K1-2-WOK/adm/Kernel.csh

Building a Toolkit

Creating a Toolkit

You create and enter a toolkit development unit using the following commands:

<blockquote>
ucreate -t <TKMyToolkit>
wokcd <TKMyToolkit>
</blockquote>

Write the Nomenclature File for the Toolkit

Using an editor, write a nomenclature file called PACKAGES which lists all the packages, one per line, that make up the toolkit. Add PACKAGES to FILES. Build the shareable library for this toolkit as follows:

\> umake [<TKMyToolkit>]

Note: when one of the packages in the toolkit is modified, recompile the toolkit. A package should belong to one toolkit only.

Sample Construction of a Toolkit

In the following example, the toolkit TKMyToolkit is created. Commands preceded by an asterisk are used only once per session:

  1. *Create MyToolkit in MyWb.
    \> ucreate -t TKMyToolkit
  2. Move to the source directory of MyToolkit.
    \> wokcd TKMyToolkit
  3. Edit the nomenclature files, PACKAGES and FILES. You do this outside tcl, using the editor of your choice.
  4. *Create the library for MyToolkit
    \> umake TKMyToolkit

Umake Steps for a Toolkit

The umake steps for development units of toolkit type are explained below.

  • src Processes FILES to list source files.
  • lib.list Works out the objects and archive library to add to the toolkit shared library.
  • lib.limit Manages the build process strategy within the limitations of a particular platform.
  • lib.arch Builds archives according to the building strategy.
  • lib.uncomp Decompresses third party archives.
  • lib.arx Extracts object files from archives.
  • lib.build Generates the shared library for the toolkit.

Building strategy depends on the platform. The following step sequences apply:

  • On Sun (Solaris):
    src
    lib.list
    lib.arx
    lib.build
  • On sil (IRIX):
    src
    lib.list
    lib.uncomp
    lib.build

The TOOLKITS File

When executables are compiled, a TOOLKITS file is used to determine which toolkits are included. This file is located in the src directory of the entity being compiled. The process is as follows:

  • If no TOOLKITS file has been found, all toolkits are candidates for substitution. To find out which toolkits are candidates, use the command w_info -k.
  • If an empty TOOLKITS file has been found, there is no toolkit candidate for substitution.
  • If a non-empty TOOLKITS file has been found, only the toolkits listed in this file are candidates for substitution.

Toolkit Substitution

Toolkit substitution is performed as follows:

  1. MyEngine uses A, B and C;
  2. The toolkit TK provides A and D; D uses E;
  3. Compilation of MyEngine includes TK, B C and E.

Here, for simplicity, assume that additional toolkits are not substituted for B, C and E.

Building a Delivery Unit

Creating a Delivery Unit

\> ucreate -d <MyDeliveryUnit>

Writing the COMPONENTS File

Create a file named COMPONENTS in the src subdirectory of the delivery development unit. List in this file the prerequisites of the delivery and the components that are part of the delivery. Use the syntax shown below. Note that keywords and default options are shown in bold.

| Name | ParcelName | | Put path | | | Put include || |Put lib || | Requires | DeliveryName* | | Package | MyPack **[CDL][LIBRARY][INCLUDES][SOURCES]** | | Nocdlpack | MyNcdl **[LIBRARY][INCLUDES][SOURCES]** | | Executable | MyExec **[CDL][DYNAMIC][SOURCES]** | | Interface | MyIntf **[CDL][STUB_SERVER][SOURCES]** | | Client | MyClient **[CDL]**[STUB_CLIENT][SOURCES] | | Engine | MyEng **[CDL][DYNAMIC][SOURCES]** | | Schema | MyShma **[CDL][LIBRARY][SOURCES][DOC]** | | Toolkit |MyTk **[LIBRARY][SOURCES]** | | Get | DevelopmentUnitName::Type\:\:\:File |

  • Without mention of the version

If no keywords are specified then all default arguments shown in bold are taken into account. To select arguments, list the ones required explicitly. The arguments are explained below:

  • Name The full name of the current delivery, including a version number. This is the name of the parcel.
  • Put path Requires that the delivery be inserted in the user path (bin directory).
  • **[CDL]** Copy the cdl files to the delivery.
  • **[LIBRARY]** Generate the static library. Copy the shareable library to the delivery. Copy the list of objects of the library.
  • **[INCLUDES]** Generate includes.origin. Copy the includes to the delivery. Copy the ddl to the delivery.
  • **[DYNAMIC]** Select to copy the static or dynamic executable file.
  • **[SOURCES]** Copy the source files.

Build the Delivery

To build the delivery unit, use the command:

\> umake <MyDeliveryUnit>

The result of building a delivery unit is a parcel, which can be installed in a warehouse and used by other workbenches.

Sample Delivery of a Parcel

In the following example a delivery is created, compiled and made into a parcel. Commands preceded by an asterisk below are used only once per session:

  1. Move to the root workbench under which the parcel is to be made.
    <blockquote>
    wokcd MyRootWb
    </blockquote>
  2. *Create MyDelivery in MyRootwb.
    <blockquote>
    ucreate -d MyDelivery
    </blockquote>
  3. Move to the source directory of MyDelivery.
    <blockquote>
    wokcd MyDelivery
    </blockquote>
  4. Use an editor to list all the prerequisites and components of the delivery in the COMPONENTS files using the appropriate syntax.
  5. Build MyDelivery.
    <blockquote>
    umake MyDelivery
    </blockquote>
    The output of the umake process is a parcel

Umake Steps for a Delivery Unit

The umake steps for development units of type delivery are explained below.

  • src Processes FILES to list source files.
  • base     Creates directories, defines the list of units, copies the parcels and the release notes.
  • get.list        Lists files to get (using Get, Resource).
  • get.copy Copy the files listed by get.list.
  • cdl.list    Lists CDL files to copy.
  • cdl.copy   Copies the files listed by cdl.list.
  • source.list Lists units from which sources are to be copied.
  • source.build    Creates a file for sources (in the format: unit.type.Z).
  • inc.list         Lists includes to copy.
  • inc.copy   Copies files listed by inc.list.
  • lib.shared Works out the inputs for building or copying shareable libraries.
  • lib.shared.build Copies or builds (depending on the platform) the shareable libraries.
  • lib.server.list   Lists interface files to copy.
  • exec.list    Lists inputs for executable delivery.
  • exec.build Creates executable in the parcel.
  • files   Works out the list of files delivered in the parcel.

Installing a Parcel

You open the root workbench of the workshop where you want to install the parcel using the following command:

\> wokcd <MyWorkshop>

To install the parcel, use the following syntax:

\> pinstall <MyParcel>

Working with Resource

Building a Resource

There is a single umake step for development units of resource type.

  • src                 Processes FILES to list source files.

Java wrapping

Creating an interface

To create an interface development unit and move to its structure, use commands:

\> ucreate -i <MyInterface>
\> wokcd <MyInterface>

Writing an Interface

Having created the interface, you select the classes and packages that you wish to make available for Java wrapping in the jni units. Use an editor of your choice to write a .cdl interface file that specifies these exported services. This file has the format:

interface MyInterface
uses
  ListOfPackages;
is
  ListOfPackages;
  ListOfClasses;
  ListOfMethods;
end;

Building an Interface

To make the services of the interface available for further wrapping, build the interface, using the command:

<blockquote>
umake [<MyInterface>] -o src
</blockquote>

Sample Construction of an Interface

In the following example a workbench, MyWb, is used for working on the interface MyInterface. Commands preceded by * (asterisk) are used only once during a session.

  1. *Create MyInterface in MyWb.
    >ucreate -i MyInterface
  2. Move to the source directory of MyInterface.
    >wokcd MyInterface
  3. Edit the source file MyInterface.cdl. You do this outside tcl, using an editor of your choice.
  4. Build the interface.
    <blockquote>
    umake -o src
    </blockquote>

Interface Files

_<Interface>.cdl_ is the primary interface file.

Umake Steps for an Interface

The umake steps for development units of type interface are explained below.

  • src - processes MyInt.cdl to list the CDL files for the development unit. Processes the FILES file to list source files.

Note Make sure you only use the src step of umake. Using umake without arguments will lead to an attempt of launching other steps relevant to the interface unit. However these steps will fail and anyway are not required for use in Java wrapping.

Creating a jni

To create a development unit of type jni and move to its structure, use commands:

<blockquote>
ucreate -j <MyJni>
wokcd <MyJni>
</blockquote>

Writing a Jni

Use an editor to write a .cdl file that specifies the interface or interfaces required by the jni. This file has the following format:

client MyJni
is
{interface MyInterface;}
{interface YourInterface;}
end;

Building a Jni

To wrap services exported by the interfaces to Java, build the jni, using the command:

<blockquote>
umake [MyJni]
</blockquote>

Sample Construction of a Jni

In the following example a workbench, MyWb, is used for working on the jni, MyJni. Commands preceded by * (asterisk) are used only once during a session.

  1. *Create MyJni in MyWb.
    <blockquote>
    ucreate -j MyJni
    </blockquote>
  2. Move to the source directory of MyJni.
    <blockquote>
    wokcd MyJni
    </blockquote>
  3. Edit the source file MyJni.cdl. You do this outside tcl, using an editor of your choice.
  4. Derive Java files (.java and .class files) and C++ files (.h and .cxx) used for wrapping.
    <blockquote>
    umake -e xcpp
    </blockquote>
  5. Compile the sources.
    <blockquote>
    umake -o obj
    </blockquote>
  6. Link the object files.
    <blockquote>
    umake -o exec
    </blockquote>

Primary jni file is Jni.cdl

Derived Java files for a Jni are:

  • <Package>_<Class>.java - Java source file of the class to be wrapped.
  • <Package>_<Class>.class - Compiled java source file.

Derived C++ files for a Jni are:

  • <Jni>_<Package>_<Class>_java.h - Include file for the C++ implementation of JNI.
  • <Jni>_<Package>_<Class>_java.cxx - C++ implementation of JNI.

Umake Steps for a Jni

The umake steps for development units of type jni are explained below.

  • src        Processes MyJni.cdl to list the CDL files for the development unit. Processes the FILES file to list source files.
  • xcpp.fill     Compiles the internal data structure to prepare for subsequent extractions.
  • xcpp.client Extracts the services declared in included interface unit(s) into Java and creates .java and *_java.cxx files.
  • xcpp.javac Compiles .java files into .class files.
  • xcpp.javah Creates .h header files.
  • obj.comp Compiles generated C++ files.
  • obj.idep    Generates dependency information for the unit.
  • exec.libs Computes full implementation dependency to prepare for linking.
  • exec.tks    Performs toolkit substitution.
  • exec.link    Generates the shared library for the development unit.

More Advanced Use

Default User Profile

There is a default user profile. If you wish to change this profile the command wokprofile is available.

An example profile is given below.

Info : Profile in : WOK:k1dev:ref
Info : Extractor : DFLT
Info : Compile Mode : Optimized
Info : Station Type : sil

Changing Parcel Configuration

Parcel configuration rarely needs changes. However, if you do need to modify the list of resources, you can do so by editing the admin parameter file of the factory. This file is found in the admin directory of the factory and is named after the workshop. It has the suffix .edl. Its full name has the following format:

<MyWorkshop>.edl.

Move to the admin directory of the factory:

\> wokcd <MyFactory> -PAdm

Then use the editor of your choice to edit the admin parameter file, MyWorkshop.edl. In this file, the parcel configuration is defined by an entry of the form:

\@set %<MyWorkshop>_ParcelConfig = “Parcel1 Parcel2...Parceln”;

The resources are listed within quotation marks. They are separated by spaces. Edit this list as required. Save the file and close it. To validate and take into account your changes use the command:

\> wokclose -a

This command closes and reopens all the entities. Without the -a option, wokclose only applies to the current entity.

Available Services

Synopsis

WOK provides sets of services, which can be grouped according to the entity they apply to:

  • General Services
  • Factories
  • Warehouses
  • Parcels
  • Workshops
  • Workbenches
  • Development Units
  • Source Management Services
  • Session Services

Common Command Syntax

Command Names

All WOK commands follow a common naming convention. This is based on a set of common command names and a group of prefixes, which denote entity type. The command name takes a prefix representing the entity to which it applies. The following prefixes exist:

  • f: for factories
  • s: for workshops
  • w: for workbenches
  • u: for development units
  • W: for warehouses
  • p: for parcels
  • wok: for commands that apply to any type of entity These prefixes are followed by a command that determines the action to be executed. Examples of such commands are:
  • create: create an entity
  • rm: delete an entity
  • info: request information Consequently, the command ucreate creates a development unit. The command wrm removes a workbench.

Command Options

All command options are expressed using a dash (-) followed by one or more key letters and, if applicable, an argument. For example:

<blockquote>
umake -f -o <argument> MyUnit
</blockquote>

The compact version of this syntax is also valid:

umake -fo argument MyUnit

This syntax conforms to the POSIX recommendations for UNIX commands. For all commands, there is a –h option, which displays help on usage.

Presentation of Commands

The general syntax of the commands is presented in this document as follows:

CommandName [option(s) [<argument(s)>] [<Entity>]]

Consequently, there are four general cases for a command:

CommandName <Entity>
CommandName <option(s)> [<argument(s)>] <Entity>
CommandName <option(s)> [<argument(s)>]
CommandName

Note a few commands described in this chapter do not completely respect this syntax; for example, create and rm.

As a rule, where an _<EntityPath>_ is given as an argument it specifies which entity the command applies to. Where no _<EntityPath>_ is specified, the command applies to the nearest appropriate entity. The create and rm commands are notable exceptions: you must specify an entity path with these commands.

General Services

General services are commands that apply to any entity manipulated by WOK. They are used for:

  • Navigation
  • Managing parameters
  • Managing profiles.

wokcd

wokcd
wokcd <EntityPath>
wokcd -P <ParamSuffix> [<EntityPath>]

Navigates between different WOK entities and changes the current working directory. Without any arguments wokcd lists the current position (the WOK equivalent of ‘pwd’). With an argument, wokcd moves to the specified location. Options:

  • _<EntityPath>_ Moves to the home directory of the entity specified by <EntityPath>, i.e. moves to the location given by the parameter: wokcd <EntityPath>_Home.
  • _-P <ParamSuffix> [<EntityPath>]_ Moves to the <ParamSuffix> directory of the entity specified by <EntityPath>. i.e. moves to the location given by the parameter: %<EntityPath>_<ParamSuffix>. If no entity path is specified, this command moves to the <ParamSuffix> directory of the current entity.

Possible values for <ParamSuffix> are: Home, Adm and Src. Use the following commands to change directories within a development unit:

  • wsrc To access the source files.
  • winc To access the include files.
  • wobj To access objects.
  • wlib To access shareable libraries.
  • wbin To access executables.
  • wadm To access the workbench administration files.

Examples

wokcd - Lists the current position.

wokcd MODEL:GTI:gti:gp - Moves to the home directory of the gp package of the gti workbench in the GTI workshop in the MODEL factory.

wokcd -P Adm - Moves to the administration directory of the current entity.

wokclose

wokclose [-a]

Closes and reopens entities, i.e. reloads them into memory thus taking any changes into account. Option -a closes and reloads all entities.

Examples

wokclose

Closes and reopens the current entity.

wokclose -a

Closes and reopens all the entities.

wokenv

wokenv -f <ScriptFile> -t csh

Creates the file <ScriptFile>. This file is a script, which configures a C shell to mirror the current WOK environment. See the Test Environments section for more details. Options:

  • -f <ScriptFile> - Specifies the name of the file to produce.
  • -t csh - Produces a file for configuring a C shell.
  • -s - Sets up environment variables for application launching.

    Example

<blockquote>
wokenv -f MyTestEnvScript -t csh
</blockquote>

Generates the shell script MyTestEnvScript to configure a C shell so that it mirrors the current WOK environment.

wokinfo

wokinfo -<option> [<EntityPath>]
wokinfo -<option> <argument> [<EntityPath>]

Displays information about _<EntityPath>_. The information displayed is common to all the entities. If no _<EntityPath>_ is specified, information about the current entity is returned. This command can be used to find the path of a file. Options:

  • -t - Returns the type of entity (factory, warehouse, parcel, workbench, development unit).
  • -T - Lists the types of files known in the entity.
  • -f - Gets factory from path.
  • -N - Gets the nesting path, i.e. where the current entity is nested.
  • -n - Gets entity name.
  • -P - Gets parcel from path.
  • -s - Gets workshop from path.
  • -u - Gets development unit from path.
  • -W - Gets warehouse from path.
  • -w - Gets workbench from path.
  • -x - Tests if entity exists.
  • -d <type> - Gets type definition.
  • -a <type> - Gets type arguments.
  • -p <type>:<filename> - Gets the path for a file, which is of the type type that depends on File. In other words, the path for a file of this type depends on the file name, <filename>.
  • -p <type> - Gets the path for a file, which is of the type <type> that is not File dependent, for example EXTERNLIB.

Examples

wokinfo -p source:gp.cdl MODEL:GTI:gti:gp

Returns the path of the source file gp.cdl in the MODEL:GTI:gti:gp.

wokinfo -t MODEL:GTI:gti:gp

Returns the development unit.

woklocate

woklocate -<option> <argument> [<WorkbenchPath>]
woklocate -P [<WorkbenchPath>]

Using WorkbenchPath as the starting point, this command locates files associated with the development unit and specified by the argument argument. Options are:

  • -f <Unit:Type:File> - Locates a file and gives its ID.
  • -p <Unit:Type:File> - Locates a file and gives its path.
  • -u <Unit> - Locates a development unit.
  • -P - Displays all available WOK public types.

Example

woklocate <MyFile>

Displays the location of the file, MyFile.

wokparam

wokparam -<option> [<EntityPath>]
wokparam -<option> <argument> [<EntityPath>]

Queries system parameters such as variables and templates. For more information about parameters refer to the appendix Parameters and EDL Files at the end of this User’s Guide. If an <EntityPath> is specified this indicates the entity to which the command applies. Options:

  • -L - Lists the directories used to search for the parameter files.
  • -C - Displays the subclasses list.
  • -a <TemplateName> - Gets arguments for the template TemplateName.
  • -e <ParamName> - Evaluates the parameter ParamName.
  • -F <ClassName> - Displays the files comprising the definition of the class ClassName.
  • -l <Class> - Lists parameters concerning class (prefix) class.
  • -S <FileName> - Finds the first file FileName in the list of directories cited afterwards.
  • -t <Name> - Tests if the variable Name is set.
  • -v <ParamName> - Displays the value of the parameter ParamName.
  • -s <Name>=<Value> Reserved for advanced use. Sets the variable Name to value Value.
  • -u <Name> Reserved for advanced use. Unsets the variable Name.

Examples

wokparam -L MODEL:GTI:gti

Returns a list of directories used for parameters by the gti workbench.

wokparam -S CSF.edl

Locates the nearest CSF.edl file used by the current entity.

wokparam MODEL:GTI:gti:gp -e %WOKUMake_Steps

Displays the value of the _%WOKUMake_Steps_ parameter in the gp package. The _%WOKUMake_Steps_ parameter contains a description of the steps used by umake.

wokprofile

wokprofile
wokprofile -<option> [<argument>]

Modifies session parameters. This command changes the mode of the current compilation and the profile of the current database. It also displays the current value of the session parameters. If no argument is specified, it displays the values of different parameters in the current session as well as the current position wokprofile -v. Options:

  • -b - Returns the current database profile (OBJS, DFLT).
  • -d - Switches to compilation with debug.
  • -m - Returns the current compilation mode.
  • -o - Switches to optimized compilation.
  • -s - Returns the current station type
  • -v - Switches to wokprofile verbose mode. In this mode all the parameters of the session are displayed. Running this command displays the current/changed profile.

Examples

wokprofile

Displays all the session parameters.

wokprofile -b

Displays the current database profile.

wokprofile -v -o

Switches to optimized compilation and displays the parameters of the current session after the change has been made.

wokprofile -o -v

Switches to optimized compilation and displays the parameters of the current session after the change has been made. Note that the order in which these options are specified does not affect the result.

Services Associated with Factories

There is a dedicated list of commands for the management of factories. The commands to create and destroy factories are reserved for the exclusive use of the site administrator.

  • fcreate Creates a factory.
  • finfo Displays information about the factory.
  • frm Deletes a factory if it is empty.

fcreate

Reserved for administrator’s use

fcreate -<option> [-D <Suffix>=<Value>]* <EntityPath>

Creates a factory. The name of the factory to create is specified by EntityPath. You can also specify the entity that will contain the entity to be created.

Once the creation is completed, a file containing the parameters of the creation of the factory is created in the administration directory of the container to which the factory belongs.

Parameters: The following parameters are mandatory when a factory is created:

  • Adm - Path name for administration directory
  • Home - Path name for home directory
  • Stations - List of supported stations
  • DBMSystems - List of supported dbms
  • Warehouse - Name of factory warehouse.

Options:

  • -P - Propose defaults. Returns a list of default values for the parameters necessary for the creation of the factory. No entity is created if this option is used.
  • -d Use default. Uses default values to create the factory.
  • -D<Suffix>=<Value> - Defines parameter(s). Specifies the value to use for the given parameter(s) explicitly. This option can be used in conjunction with the –d option to take default values for all the mandatory parameters except the parameter(s) explicitly specified here.

Examples

fcreate -P NewFactoryName

Returns a list of default values for the parameters that are mandatory when creating a factory.

fcreate MyFactory -d -DHome=/fred/myfactory

Creates the factory MyFactory using default values for all mandatory parameters, except for Home, which is set to: /fred/myfactory

finfo

finfo -<option> [<EntityPath>]

Displays details about the factory. If an EntityPath is specified this determines the factory to apply to. If no entity path is given, the command applies to the nearest factory. Options:

  • -s - Displays a list of workshops in the factory.
  • -W - Displays the name of the warehouse in the factory.
  • -S - Displays the name of the source repository.

Examples

finfo -s

Displays a list of workshops in the nearest factory.

finfo MyFactory -W

Displays the name of the warehouse in MyFactory.

frm

Reserved for administrator’s use

frm <EntityPath>

Deletes the factory specified by EntityPath if it is empty.

Note, that you must not be in the factory you intend to destroy.

Example

frm MyFactory

Deletes the factory MyFactory provided that it is empty.

Services Associated with Warehouses

A warehouse contains the parcels that are available in a factory. There is a dedicated list of commands for management of warehouses. The commands you use to create and destroy the warehouses are reserved for the exclusive use of the site administrator.

  • Wcreate - creates a warehouse.
  • Winfo - displays information about the warehouse
  • Wrm - deletes a warehouse if it is empty.
  • Wdeclare - declares a parcel in the warehouse.

Wcreate

Reserved for administrator’s use.

Wcreate [-<option>] -D <Suffix>=<Value>* <WarehouseName>
Wcreate -<option> [-D <Suffix>=<Value>]* <WarehouseName>

Creates a warehouse. The name of the warehouse to create is given by *<WarehouseName>*. You can also specify the factory that will contain the warehouse. Once the creation is completed, a file containing the parameters of warehouse creation is in its turn created in the administration directory of the factory to which the warehouse belongs.

Parameters: The following parameters are mandatory when a warehouse is created:

  • Adm - Path name for administration directory.
  • Home - Path name for home directory.
  • Stations - List of supported stations.
  • DBMSystems - List of supported dbms.

Options:

  • -P - (Propose defaults.) Returns a list of default values for the parameters necessary for the creation of a warehouse. No entity is created if this option is used.
  • -d - (Use defaults.) Uses default values to create the warehouse.
  • -D <Suffix>=<Value> (Define parameter.) Explicitly specifies the value to use for this parameter. This option can be used in conjunction with the –d option to take default values for all the mandatory parameters except the parameter(s) explicitly specified here.

Examples

Wcreate -P MyWarehouse

Returns a list of default values for the parameters that are mandatory when creating a warehouse.

Wcreate MyWarehouse -d

Creates the warehouse MyWarehouse using default values for all mandatory parameters.

Winfo

Winfo -p [<EntityPath>]

Displays details about the warehouse and its contents. If an EntityPath is specified, this determines the warehouse to apply to. Option -p displays the parcels in the warehouse.

Example

Winfo -p

Displays a list of parcels in the current warehouse.

Wrm

Reserved for Administrator’s Use.

Wrm <EntityPath>

Deletes the warehouse specified by EntityPath if it is empty. You should not be in the warehouse you intend to destroy.

Example

Wrm MyWarehouse

Deletes the warehouse MyWarehouse provided that it is empty.

Wdeclare

Reserved for administrator’s use

Wdeclare -p<Parcel> [-d] [-D<ParamName>=<Value>]* <House>

Declares the Parcel. This command adds the parcel to the list of parcels available in the warehouse House. Note that a factory has a default list of deliveries (which are represented by parcels) available to it. This list only needs to be modified when moving to a new version of the delivery. This is done using the Wdeclare command, and then by editing the .edl file of the appropriate workshop.

The following parameters are mandatory when declaring parcels:

  • Adm - Path name for administration directory of a parcel.
  • Home - Path name for home directory of a parcel.
  • Stations - List of available stations.
  • DBMSystems - List of available dbms.
  • Delivery - Delivery name.

Options:

  • -p <Parcel> Defines the name of the parcel to declare. This name must be given with the option.
  • -d Creates a parcel using defaults.
  • -P Proposes defaults.

Example

Wdeclare -pMyParcel -d MyWarehouse

Adds the parcel MyParcel to the warehouse MyWarehouse.

Services Associated with Parcels

A parcel is a receptacle for development units. You use it to group together the units, which comprise a delivery unit. There is a dedicated list of commands for management of parcels. Only the site administrator should perform installation of parcels in a warehouse.

  • pinfo - displays information about the contents of the parcel
  • pinstall - installs the parcel in a Warehouse.

pinfo

pinfo -<option> [<ParcelPath>] - displays details about the contents of the parcel. If ParcelPath is specified this determines the parcel to apply to. If no parcel path is specified the command applies to the nearest parcel.

Options:

  • -d - Displays the delivery contained in the parcel.
  • -l - Displays the development units in the parcel.
  • -a - Lists the development units in the parcel together with their types.

Examples

pinfo -l MyParcel

Displays a list of units in the parcel MyParcel.

pinstall

Reserved for administrator’s use

pinstall <ParcelName>

Installs the parcel <ParcelName> in the current warehouse. The process of installing a parcel sets up various paths and variables to ensure that the application can locate necessary resources and so on. The administrator must perform pinstall for each platform used.

Example

pinstall MyParcel

Installs the parcel MyParcel in the current warehouse.

Services Associated with Workshops

A workshop is a tree of workbenches using the same parcel configuration. There is a dedicated list of commands for management of workshops. The commands to create and destroy workshops are reserved for the exclusive use of the site administrator.

  • screate - creates a workshop.
  • sinfo - displays information about the workshop
  • srm - deletes a workshop if it is empty.

screate

Reserved for administrator’s use

screate [-<option>] {-D<Suffix>=<Value>}* <WorkshopName>
screate -<option> <WorkshopName>

Creates a workshop, <WorkshopName>. You can also specify the factory that contains this workshop. Once the creation is completed, a file containing the parameters for the creation of the workshop is generated in the administration directory of the factory to which it belongs.

The following parameters are mandatory when creating a workshop:

  • Adm - Path name for administration directory.
  • Home - Path name for home directory.
  • Stations - List of supported stations.
  • DBMSystems - List of supported dbms.
  • ParcelConfig - List of parcels used.
  • Workbenchlist - Path name for the list of workbenches.

Options:

  • -P (Propose defaults.) Returns a list of default values for the parameters necessary for the creation of a workshop. No entity is created if this option is used.
  • -d (Use defaults.) Uses default values to create the workshop.
  • -D <Suffix>=<Value> (Define parameter.) Specifies the value to use for this parameter explicitly. This option can be used in conjunction with the –d option to accept default values for all the mandatory parameters except the parameter(s) explicitly specified here.

Examples

screate -P <WorkshopName>

Returns a list of default values for the parameters that are mandatory for creating a workshop.

screate MyFactory:MyWorkshop -d

Creates the workshop MyWorkshop in the factory MyFactory, using default values for all mandatory parameters.

screate -DParcelConfig=Parcel1,Parcel2 MyFactory:MyWorkshop -d

Creates the workshop MyWorkshop in the factory MyFactory, using default values for all mandatory parameters except for ParcelConfig, which is set to Parcel1 Parcel2.

sinfo

sinfo -<option> [WorkshopName]

Displays details about the workshop. If WorkshopName is specified this determines the workshop this command is applied to. If no workshop is specified the command applies to the nearest workshop. Options:

  • -w - Displays a list of workbenches in the workshop.
  • -p - Displays the parcel configuration of the workshop.

Example

sinfo -w

Displays a list of workbenches in the nearest workshop.

srm

Reserved for administrator’s use

srm WorkshopName

Deletes the workshop <WorkshopName> if it is empty. You must not be in the workshop you intend to destroy.

Example

srm MyWorkshop

Deletes the MyWorkshop provided that it is empty.

Services Associated with Workbenches

A workbench is the place where a developer (or a team of developers) works on a particular product. There is a dedicated list of commands for management of workbenches.

  • wcreate - creates a workbench.
  • w_info - displays information about a workbench.
  • wrm - deletes a workbench if it is empty.
  • wmove - moves a workbench to a new location.

wcreate

wcreate -f <ParentWB> [-D <Suffix>=<Value>]* <WBName>
wcreate -f <ParentWB> -P|d [-D <Suffix>=<Value>]* <WBName>
wcreate -f <ParentWB> -P|d <WBName>

Creates the workbench <WBName> as a child of the workbench <ParentWB>. The result of this creation is a directory structure. Compared to the creation of other entities, creating a workbench requires an additional piece of information: you must specify the parent of the workbench to create. Once the creation is completed, a file containing the parameters of the creation of this workbench is created in the administration directory of the workshop that contains it. Parameters: The following parameters are mandatory when creating a workbench:

  • Adm Path name for administration directory.
  • Home Path name for home directory.
  • Stations List of supported stations.
  • DBMSystems List of supported dbms.

Options:

  • -f - Specifies the parent workbench.
  • -P - (Propose defaults.) Returns a list of default values for the parameters necessary for the creation of the workbench. No entity is created if this option is used.
  • -d - (Use defaults.) Uses default values to create the workbench.
  • -D <Suffix>=<Value> - (Define parameter.) Specifies the value to use for this parameter explicitly. This option can be used in conjunction with the –d option to take default values for all the mandatory parameters except the parameter(s) explicitly specified here.

Example

wcreate -P WorkBenchName

Returns a list of default values for the mandatory parameters to create a workbench.

wcreate MyWorkbench -d

Creates the workbench MyWorkbench using default values for all mandatory parameters. Note The –f option of this command is not obligatory. The system administrator can create the root workbench of a workshop without specifying a parent workbench.

w_info

w_info -option[Workbench]
w_info -option argument[Workbench]

The w_info command is the exception to the common command syntax. The form w_info is used instead of winfo because the latter already exists as a tcl/tk command and cannot be reused as a name by WOK. If <Workbench> is specified, this determines the workbench to apply to. If no <Workbench> is specified, the nearest workbench is used.

Using the tcl winfo command by mistake generates an error message, but does not cause any damage.

Options:

  • -l - Lists the development units in the workbench.
  • -a - Lists the development units in the workbench along with their respective types.
  • -f - Displays the parent workbench.
  • -A - Lists all the ancestors of the workbench.
  • -k - Lists visible toolkits.
  • -S <arg> - Lists suppliers of the unit <arg> within the visibility of the workbench.
  • -S <execname:partname> - Lists the suppliers of the component executable partname within an executable development unit execname.
  • -I <arg1, arg2 ... argN> - Lists the development units, sorted by order of implementation dependency.

Example

w_info -S MyDevUnit

Returns a list of suppliers of the development unit MyDevUnit within the visibility of the current workbench.

wrm

wrm Workbench

Deletes the workbench, provided that it is empty and has no children. You must not be in a workbench you intend to destroy.

Example

wrm MyWorkbench

Deletes MyWorkbench, provided that it is empty and has no children.

wmove

Reserved for advanced use wmove -f <NewParentWorkbench> <Workbench> Moves the <Workbench> (and its children), to a different parent NewParentWorkbench within the same workshop. Option -f <argument> specifies the new parent workbench.

Example

wmove -f MyOtherWorkbench MyWorkbench

Moves the MyWorkbench under MyOtherWorkbench.

wprocess

wprocess <WorkbenchName> <options>

Allows automatic reconstruction of a workbench.

Options:

  • -DGroups =Obj,Lib,Exec - Selects groups Obj, Lib and Exec.
  • -DUnits = MyUd1,MyUd2,... - Selects the development units MyUd1, MyUd2 etc.
  • -DXGroups =Src,Deliv - Excludes groups Obj and Deliv.
  • -DXUnits=MyUd1,MyUd2,... - Excludes units MyUd1, MyUd2 etc.
  • -B <Profile> - Selects the extraction profile.
  • -f - Forces all selected steps.
  • -d | -o - Switches between debug and optimized modes.
  • -P - Prints out the selected steps.
  • -S - Silent mode (no print of the banner).
  • -L - Logs output to MyUD_<step code>. Log in step administration directory. Valid group names are: Src, Xcpp, Obj, Dep, Lib, Exec, Deliv.

Example

wprocess -DGroups=Src,Xcpp,Obj,Lib,Exec

Compiles the whole workbench

Services Associated with Development Units

The development unit is the basic building block of development work in the WOK environment. It is the base component of Open CASCADE Technology architecture. For a list of available types of development units refer to the Development Units section. There is a dedicated list of commands for management of development units.

  • ucreate Creates a development unit.
  • uinfo Displays information about the development unit.
  • urm Deletes a development unit.
  • umake Builds a development unit.

ucreate

ucreate [-<TypeCode>] <UnitName>
ucreate -P

Creates a development unit named <UnitName> of type <TypeCode>.

Once the creation is completed, a file containing the parameters of the creation of the development unit is generated in the administration directory of the workbench to which the development unit belongs.

TypeCodes:

  • -p - Creates a development unit of type package. This is the default option. Where no option is specified, a development unit of type package is created.
  • -n - Creates a development unit of type nocdlpack.
  • -s - Creates a development unit of type schema.
  • -t - Creates a development unit of type toolkit.
  • -d - Creates a development unit of type delivery.
  • -x - Creates a development unit of type executable.
  • -f - Creates a development unit of type frontal.
  • -r - Creates a development unit of type resource.
  • -P - Displays ucreate creation possibilities in format: <TypeCode> <TypeName>.

Examples

ucreate -p MyWorkbench:MyPackage

Creates the development unit MyPackage in MyWorkbench. The unit is of package type.

uinfo

uinfo -t|c [<UnitPath>]
uinfo -f|F|p [-<FilterOption> [<Type>]]* [<UnitPath>]

Displays details about the development unit. Where no <UnitPath> is specified, details of the current unit are displayed. Filter options are available for use in conjunction with the options -f, -F, -p to filter the file list. Combinations of filter options can be used.

Note that the uinfo command is based on the results of construction using umake. As a consequence, the list of files displayed by uinfo is only valid if the construction has completed normally. Similarly, the list of files derived from the CDL is only valid if the CDLs of the unit have been translated successfully.

Options:

  • -t - Displays the type of the development unit as a string.
  • -c - Displays the typecode of the development unit, i.e. a single character, as used by ucreate to indicate package (p), schema (s) and so on.
  • -f - Displays a list of file names associated with the unit.
  • -F - Displays a list of file names associated with the unit, together with their respective types. Types of files include for example: source, library, executable, and pubinclude. To display a full list of file types, use the command ucreate.
  • -p - Displays the full paths of the files associated with the unit. Filter Options:
  • -T - <Type> Displays files of type <Type> only.
  • -i - Displays only independent files, i.e. files that are not specific to a DBMS, for example sources.
  • -s - Displays only station dependent files.
  • -b - Displays only DBMS dependent files.
  • -B - Displays only files that are dependent on *both *DBMS and Station.
  • -l - Displays only files that are local to the workbench.
  • -m - Displays only missing files, i.e. files that are listed, but not found.
  • -e - Displays only existing files, i.e. files that are listed and found.

Examples

uinfo -Fp

Displays the types, paths and names of all files associated with the unit.

uinfo -f -Tpubinclude MyWorkbench:MyUnit

Lists the names of the header files associated with the unit MyUnit which is in MyWorkbench.

urm

urm <UnitPath>

Deletes the development unit <UnitPath> with its directory structure and its files, even if the unit is referenced by another one.

Example

urm MyWorkBench:MyPack

Deletes the development unit MyPack found in MyWorkBench.

umake

umake -S [<UnitPath>]
umake [-f][<UnitPath>]
umake [-f]-o<step> [-t<target>]* [-o<step> [-t<target>]*]*[<UnitPath>]
umake [-f][-s <step>] [-e <step>][<UnitPath>]
umake

Builds a development unit. The build process includes compilations, links, and various other actions, which make the development unit usable. The build process is specific for each type of development unit, refer to chapter 3 for details. The following properties apply:

  1. There are steps identified by a keyword.
  2. The steps involved and their content depends on the type of development unit being treated.
  3. You can ask for single step execution using the -o option.
  4. Unless explicitly requested using the –f option, the operations are carried out in those steps where necessary.
  5. Only the processed development unit is modified.

Used without any arguments the umake command carries out all of the steps appropriate for the development unit to be constructed. Using keywords and arguments you can perform the build process step by step.

Options:

  • -S - Displays the list of steps.
  • -s <step> - Starts the build process at the step specified.
  • -e <step> - Ends the build process at the step specified.
  • -o <step> - Only executes the step specified.
  • -t <target> - Specifies the target to build.
  • -f - Forces the build process, skipping the verification of dependencies.

Example

umake gp

Builds the gp package.

Specifying Targets (-t) for umake

The umake command is also used to specify build targets and extract C++ method prototypes. src, xcpp and obj units can be targeted. The syntax is explained below. For delivery units (for all options apart from *.list) the syntax is as follows:

-\*.\* -t MyDU
umake MyDeliv -olib.shared.build -tMyUD.

src

This target computes a source file list as in the example below:

umake -o src MyUnit

xcpp

Extracts C++ header files. For -xcpp.* (with the exception of *.fill), the syntax is as follows:

umake -o -xcpp.* -t MyPack_MyClass

You extract the method prototypes using the following command:

umake -o xcpp.template [-t<class>|-t<package>]

This syntax of umake command is only used with packages. It extracts the C++ prototypes of the methods of the classes contained in the package. The generated files are placed in the src directory of the current package. These files always have a .template suffix. With each extraction of a class, these files will contain all the methods of the class. Prototypes are extracted for:

  • Ordinary classes (non-instantiated)
  • Generic classes (including nested generic classes)
  • Package methods Classes, which are instantiations of generic classes, are not extracted. Nor are other CDL types (exceptions, alias, etc.) which have no user implementation. For each class, we extract the prototypes of:
  • Instance methods
  • Class methods
  • Constructors The extracted files are the following:
  • for an ordinary class C
    • C.cxx.template for the non-inline class methods.
    • C.lxx.template for the inline class methods.
  • for a generic class G
    • G.gxx.template for the non-inline class methods.
    • G.lxx.template for the inline class methods.
  • for a package method P
    • P.cxx.template for the non-inline package methods.
    • P.lxx.template for the inline package methods.

obj

Specifying the target, obj compiles the object files for one or more files. The syntax for -obj.* is as follows:

umake -o -obj.* -t MyPack_MyClass.cxx

In a package, the following command executes all construction steps up to and including obj, doing for each of them only what is strictly necessary:

umake -s obj

The following command will recompile all the primary sources of a package which are out of date:

umake -o obj

Customizing umake

You can use three levels of umake customization for a development unit.

  • Compiler and link options, EXTERNLIB
  • Step definition
  • Tcl umake step implementation These different levels of complexity correspond to the needs of regular users and more advanced users.

Modification of Compiler and Link Options and EXTERNLIB

Customization at this level involves setting parameters of existing umake steps using an .edl file. This file is taken into account each time umake is performed. It contains a series of assignments or appended variables used when creating the development unit. These commands can be preceded by instructions dedicated to the preprocessor in order to adjust its behavior within the actual context.

EXTERNLIB uses resources contained in Open CASCADE Technology prerequisites. To avoid referencing the path of these resources more than one time, the user may use the component EXTERNLIB to include these resources automatically via the link. The file contains the name of parameters, which are set independently.

The umake command does not generate actual dependencies. To avoid any cumbersome dependencies, for example, if you do not want the shareable library file for a package but the package enumeration only, use the INTERNLIB component listed in FILES, to get only the given dependencies.

In practice, the generated file, <myUD>.ImplDep, in the /drv/adm directory, is copied into INTERNLIB. INTERNLIB contains lines of enumerations, as below:

Dependence 1
Dependence 2
...

The example below illustrates how you can modify your WOK compiler options. Refer to Using EDL to Define WOK Parameters for an example of how to set link options as well as for more details about available parameters and .edl files.

-- File Name: Kernel_CMPLRS.edl
-- Copyright: Matra Datavision 1996
#---------------------------------
#// First, ensure that we only execute this file once
\@ifnotdefined ( %Kernel_CMPLRS_EDL ) then
\@set %Kernel_CMPLRS_EDL = **;
#// Then set C++ compilation options, based on workstation type:
\@if( %Station == *sil* ) then
\@set %ModeOpt = * *;
\@endif;
\@if( %Station == *ao1* ) then
\@set %ModeOpt = *-g *;
\@endif;
\@if( %Station == *hp* ) then
\@string %CMPLRS_C_Options += * -Aa -D_HPUX_SOURCE +e*;
\@endif;
\@endif;

Step Definition

The WOK umake command uses a dependency tree. This dependency tree is a graph that shows the umake steps, their inputs and their dependencies. You use it to perform the build, for example to ensure that only files, which have changed, and the files, which depend on these modified files, are recompiled.

This dependency tree is defined in an .edl file. The steps are listed in an order. Each is assigned a name and has its inputs specified. The output of one or more steps is the input to another step.

The following steps are standard for WOK umakes: src, src.list, exec.comp and exec.link. Any new step that you insert into the tree must be associated with a tcl program, which will be responsible for performing the step. You supply these tcl programs. For more details of tcl programming refer to the examples below and also to the Tcl Overview section.

The following example defines a umake dependency tree and introduces two new steps: exec.kerobj and exec.core. Each of these steps is then associated with a tcl program.

-- File Name: DCube_WOKSteps.edl
\@ifnotdefined (%DCube_WOKSteps_EDL) then
\@set %DCube_WOKSteps_EDL = **;
\@string %WOKSteps_ObjGroup += *obj.libs obj.arx obj.objs *;
---\@set %WOKUmake_Steps =**src obj.inc(src) objc.cgen(src) obj.comp(src, obj.cgen) obj.libs(src) obj.arx(obj.libs) obj.objs(obj.arx) obj.lib(obj.comp, obj.objs) obj.idep(obj.comp,src)*;
\@set %WOKSteps_obj_libs = *DCube_Libs(src)*;
\@set %WOKSteps_obj_arx = *WOKStep_LibExtract(obj.libs)*;
\@set %WOKSteps_obj_objs = *DCube_Objs(obj.arx)*;
\@set %WOKSteps_obj_lib = *WOKStep_DynamicLibrary(obj.comp, obj.objs)*;
\@set %WOKSteps_toolkit_ListWith = *obj.comp obj.objs*;
\@endif;

Tcl Step Implementation

Customization at the tcl step level requires an understanding of the build process and the WOK dependency tree. Modification at this level is generally used to add elements to the build which are not described in the CDL. For example one possible use is to include external libraries or files into the final shareable library. Refer to Writing Tcl Steps for a WOK Build for more details.

Source Management Services

You use the source management services to integrate source files between a root workbench and one of its children. The services are related to a particular workshop.

  • wprepare - displays a report of the files state in the current workbench (as compared with the files in the root workbench).
  • wstore - queues a report for further integration and stores the related files.
  • wintegre - performs check-in operations for requested files and updates the root workbench.
  • wnews - allows management and use of data stored in the integration journal.
  • wget - imports source files to the current workbench.

wprepare

wprepare –wb <father workbench> [-ud <ud1,ud2,...,udN>] -o [<filename>]
wprepare –wb <father workbench> [-ref][-ud <ud1,ud2,...,udN>] -o [<filename>]

Prepares a report for integration to a reference (root) Workbench. This command prints a comparison of the state of source files contained in the specified units, <ud1,ud2,...,udN,> of the current workbench.

This workbench must be a direct descendant of the root workbench. If no unit names are specified, all the units in the workbench are processed. By default, the results of the comparison are printed to the standard output. The differences are computed in relation to the root workbench.

For each file, the status is indicated as follows:

  • # The file has been modified.
  • \= The file was found in the current workbench but was not modified.
  • - The file has been removed. In other words, the entry was deleted from FILES).
  • + The file has been added. In other words, the entry has been added in FILES).

Options:

  • -ref - Creates a report that is used to initialize a base of source files. This report is used with the wintegre -ref command.
  • -ud <ud1>, <ud2>, ..., <udN> - Specifies the list of development units to prepare for integration. Separate the unit names with a comma. If no unit names are specified, all the units in the workbench are processed.
  • -o <fileName> - Writes the integration report to the specified file. By default, the report is displayed (i.e. written to standard output).
  • -wb <The name of target workbench> - Specifies the name of target workbench. It should be one of father workbenches with attached integration queue.

wstore

wstore –ls –wb <MasterWb>
wstore -cat <ID>
wstore [-trig] -rm <ID> [-f] –wb <MasterWb>
wstore –create –wb <MasterWb>
wstore [<FileName>]

This command manages the queue of pending reports. When a report is queued it is given a unique number also called a report-ID.

Options:

  • <FileName> - Adds a report from the file FileName to the report queue.
  • -trig - Calls a tcl procedure after the report has been processed. This tcl procedure must be located in the admin directory of the workshop and the file must be named wstore_trigger.tcl. An example of a trigger can be found in the file $env(WOK_LIBRARY)/wstore_trigger.example.
  • -ls - Lists pending reports, together with their owners and their IDs. This is a default option. If two files are found with the same name in the same development unit in two different reports the full path of each of these files is displayed.
  • -cat <Report_ID> - Displays the contents of the report <Report_ID>.
  • -rm - Removes a report from the report queue.
  • -f - Forces deletion. This option must be used with the -rm option when you delete a report that you do not own.
  • -param - Lists queue parameters associated with the workbench.
  • -create –wb <MasterWb> -queue <any/dir> -type SCCS - Creates an integration queue associated with MasterWb workbench, queue should be located at any/dir and specify SCCS type of database.

Possible options for –create are:

  • -queue - Specify the name of directory under which queue is created
  • -type - Specify the type of database (can be SCCS or RSC, SCCS by default)
  • -base - Specify the location where to put the repository (only for SCCS database). Default behavior: creates repository in the adm directory of the master workbench.
  • -counter - Specify the name of directory where the integration counter is located. Default behavior: creates subdirectory adm in directory created using –base option
  • -journal - Specify the location of integration journal. Default behavior: : creates subdirectory adm in directory created using –base option
  • -welcome - If increment contains new development units, by default store will refuse such increment. If you want to be able to add new units to MasterWb through integration mechanism use – welcome option.

Example

wstore ReportName –wb MasterWb

Queues the report ReportName and saves a copy of the files mentioned in the report. This copy will be used when the report is actually processed by the command wintegre.

wstore –wb MasterWb -f -rm Report_ID

Removes the report Report_ID from the queue, even if you do not own it.

wintegre

wintegre [<reportID>] –wb <MasterWb>

Processes a report and removes it from the queue in the current workshop.

Parameters:

  • <reportID> - Number indicating the rank of the report in the integration queue. Use the command wstore –l to get this number.

Options:

  • -ref <BaseNumber> - Initializes the version of the elements in the repository.
  • -all - Processes all the reports in the integration queue.
  • -wb - Specify the integration queue of which workbench should be used
  • -norefcopy - Updates the repository but not the target workbench.
  • -nobase - Updates the target workbench but not the repository. This option is rather useful when copying a set of UDs from a workbench into another.
  • -param - Shows the parameters’ current value.

Note that the -nobase and -norefcopy options are mutually exclusive.

Examples

wintegre -ref 2 1 –wb ref

Uses the report whose ID is 1 to initialize the ref workbench with BaseNumber equal to 2.

wintegre 1 –wb ref

Integrates the report whose ID is 1 to ref workbench.

wintegre -f 8 –wb ref

Forces the integration of report 8. Use the –f option if you want report 8 to be processed first.

wprepare -MyWb -o/tmp/MyReport
wstore /tmp/MyReport (GetID say 3) –wb ref
wintegre –wb ref -nobase 3

Edit the comment and modify /tmp/MyReport if required with current workbench accessed from ref workbench. You may use the -nobase option adding the following line in the VC.edl file (Adm of the concerned file):

\@set %VC_TYPE = *NOBASE*;

wnews

The command has the following syntax:

wnews [-x] [-from p1 -to p2] [-headers|-units|-comments|- all] [-command TclCmd]
wnews -set markname [ -at p ]
wnews -ls [-bydate]
wnews -rm markname
wnews -admin
wnews -purge

The wnews command allows managing and using the data stored in the integration journal. The integration journal is updated via the command wintegre each time an integration is performed; it contains all the UDs and files concerned with the integration, as well as the comments provided by the developers (reports).

Every integration is numbered and the associated files are archived with a specific version number. Marks can be set on specific zones of the integrations via the wnews command. A mark is a character string which does not contain any dash character (-) and is associated with an integration number. Several marks may point to the same number, but one mark may only point to one number.

Note that BEGIN and END are reserved mark names. You cannot use them.

Options:

  • -from p1 -to p2 - Extracts a portion of the journal file between index p1 and p2, with p1 and p2 integration numbers or marks. If p1 is not specified, reports are extracted from the beginning of the journal file. If p2 is not specified, reports are extracted up to the end of the journal file.
  • -at p - Places a mark at index p, with p being an integration number. If p is not specified, the mark is placed at the end of the journal.
  • -ls [-bydate] - Lists the marks. If -bydate is specified, the marks are listed in the order they were created. Otherwise, they are listed according to their place in the journal file.
  • -rm <markname> - Removes the mark markname.
  • -admin - Displays the journal location, date and other information.
  • -purge - Saves the journal file and creates a new empty one.

Additional options:

  • -o file <name> - Redirects output in file. This option is ignored if -command is specified.
  • -ws <shop> - Uses journal of shop instead of the current one. shop must belong to the current factory.
  • -command <MyCommand> - Runs the command Tcl MyComm on the specified part of the journal. The syntax is the following: proc MyComm { comments table args } { ...}, where comments is a string containing all the comments on the integration between n1 and n2, and table is a table indexed with the names of the concerned uds (each element of the table is a list of UD files with definition of their status and version). Additional arguments may be passed using userdata with the argument args containing mydata1, mydata2.

Wok provides a similar procedure wnews:cpwb, which allows to copy UDs from one workbench into another.

Note that you may access the associated code of this command by typing tclsh>cat $env(WOK_LIBRARY)/news_cpwb.tcl

For example, we can add the following to the file Me.tcl:

proc MyComm {comments table args} {
puts *comments = $comments*
parray table
puts *args = $args*
return
}

Then type the following commands:

\> source Me.tcl
\> wnews -x -from n1 -to n2 -command MyComm -userdata wb1 wb2

Examples

wnews -set BETA_V1.1 -at 345

Sets a mark on integration number 345

wnews -set RELEASED_V1.1_CLOSED

Sets a mark after the last integration performed

wnews -ls

Lists all the marks set in the journal

wnews -x -from INT_DEB -to INT_END -units

Gets all the UDs modified between integrations INT_DEB and INT_END. Integration numbers and marks may be mixed as in the following:

wnews -x -from INT_DEB -to 856 -comments
wnews -x -from INT_DEB -to INT_END -comments

Gets all the comments from the integrations between INT_DEB and INT_END

source Mycommand.tcl
wnews -x -from INT_DEB -to INT_END -command Mycommand

In a more elaborate way, a Tcl process may be called to get all information on the reports between INT_DEB and INT_END.

wnews -x -from n1 -to n2 -command wnews:cpwb –userdata w1,w2,[ulist, notes]

All modified files between n1 and n2 are copied from workbench w1 into workbench w2. New UDs are created in w2 if required If ulist is specified, only the UDs contained in this list are Processed. If notes is specified, all comments between n1 and n2 are written into this file.

wget

wget [-l] –wh <MasterWb>
wget [-f] –wb <MasterWb> [-ud <UnitName>] <SourceFile> [-v <Version>]
wget [-f] –wb <MasterWb> [-ud <UnitName>] <SourceFile1>...<SourceFileN>

The wget command allows importing source files into the workbench. The files are fetched from the SCCS database of the factory. This operation is known as a check-out operation. You can specify one or more files or a unit name. By default, the latest version of the files is fetched.

Options:

  • <SourceFile> - Fetches a copy of the specified file.
  • -ud <UnitName> Fetches all the source files of the development unit you specified.
  • -f Forces existing files to be overwritten.
  • -v <Version> Fetches <Version> of the file you specified.
  • -l Lists the files of the development unit that can be copied (i.e. that you can get). This is a default option.

Example

wget –wb MasteWb –ud MyUd File1.cxx File2.hxx

Fetches the latest version of File1.cxx and File2.hxx.

Installation Procedure

In the new WOK model:

  • each workbench can have its own database
  • the version control environment variables are relative to the workbench.
    wok_image014.png
     "Workshop Installation Model"

The following procedure explains how to set up the source management environment for a workshop.

  1. Open the factory and the workshop.
    \> wokcd <factory:workshop> -P Adm
  2. Define the environment variables for version control by editing the file VC.edl. Your entries should respect the following syntax:
    \@set %VC_TYPE=”SCCS”
    \@set %VC_ROOT=”/dirA/dirB/.../<MyDir>”
  3. Reopen the workbench that you want to connect to the database.
    \> wokcd <factory:workshop:workbench>
  4. Create SCCS database associated with workbench.
    \> wstore –create –wb <factory:workshop:workbench> -queue <PathToQueue>
  5. Create a report associated with the root workbench.
    \> wprepare –wb <workbench> -o ref.report
  6. Queue this report.
    \> wstore –wb <workbench> ref.report
  7. Perform the actual creation of the SCCS database.
    <blockquote>
    wintegre –wb <workbench> < BaseNumber >
    </blockquote>
    Here <BaseNumber> is the first digit of the SCCS version numbers.

Integration Procedure

To integrate, proceed as follows:

  1. Create the report for the current workbench.
    \> wprepare –wb MasterWb -o MyReport
  2. If necessary, edit this report to remove lines and append comments. Comments should begin with – (double hyphen).
  3. Queue the report and store the files.
    \> wstore –wb MasterWb MyReport
    By this step, all the files you have modified have been stored and the report has been queued. You can continue with modifying these files.
  4. Examine the state of the integration queue to get the ID of your report.
    \> wstore –wb MasterWb -ls
  5. Perform the integration and be sure you can write in the root workbench. This operation is usually reserved for the workshop administrator.
    \> wintegre –wb MasterWb [ID]

Session Services

A single session service is also available to allow you to query WOK. Sinfo command returns details of the WOK session.

Sinfo -option

Options:

  • -F Gets factory list
  • -f Gets current factory
  • -s Gets current workshop
  • -w Gets current workbench
  • -u Gets current development unit
  • -t <entity_path> Gets the entity type
  • -E Reserved for internal use. Gets known Entity List
  • -N Reserved for internal use. Gets known Entity Names

Example

Sinfo -F

Returns a list of WOK factories.

Convenience Aliases

To ease the upgrade to the new version of WOK a number of aliases, compatible with the old version, have been set up. These convenience aliases include:

  • fcd - Moves to the specified factory.
  • scd - Moves to the specified workshop.
  • wcd - Moves to the src directory of the specified development unit.
  • wdrv - Moves to the drv/DBMS/Station directory of the current development unit.
  • wls - Lists the development units in the current workbench.
  • wsrc - Moves to the src directory of the current development unit.

Using the Graphic Interface

The following is an overall description of the IWOK main menu bar. Please, refer to the on-line help to get more detailed information on the various applications accessed via the graphic interface.

Main menu bar

wok_image015.png

Menus

The main menu bar contains three menus:

  • File to exit the iwok session,
  • Windows to display all windows created in the session,
  • Help to display the associated on-line help.

Application icons

The four icons on the left are used to access applications:

  • wprepare, allows preparing the integration queue being associated with a given workshop,
    wok_image016.png
  • umake, gives access to all available umake options plus compilation options,
    wok_image017.png
  • CDL browser, provides information on the class structure or translated classes,
    wok_image018.png
  • parameters, allows displaying and editing all EDL files.
    wok_image019.png

Note: for further information on CDL, refer to the CDL Reference Manual.

Display management

Click on the logo to either display or not the session in a window just below the main menu bar.

You may choose to display icons in the window, either in columns, with the last modified first, by date and size, or in rows.

Use the go up icon to navigate through the session and wokcd to update the window where the session was started.

wok_image020.png

The field Location gives the exact address of the item in the session. Use the arrow on the right to select already visited addresses.

Popup menus

Two types of popup menus may be accessed according to the context. Just click MB3 to display the popup menu.

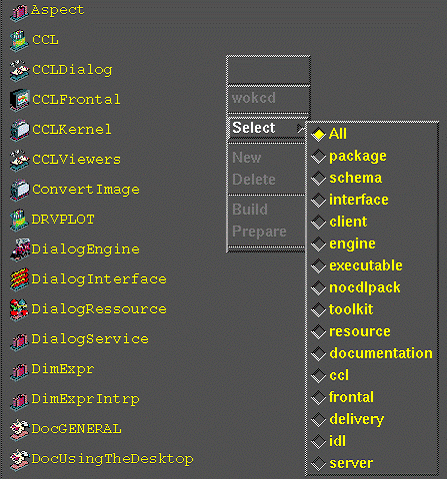
Click on an item in the left window to get the popup menu providing access to applications.

wok_image021.png

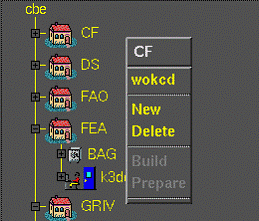
In the right window you get the selection popup menu for the item types:

wok_image022.png

Appendix A. Using the Emacs Editor

WOK is operated using the editor Emacs. Emacs is not provided in the Open CASCADE Technology distribution but is available from http://www.gnu.org/software/emacs/#Releases

A CDL mode has been created for Emacs. The .el file for this mode is not provided in the distribution, but is available on request from OPEN CASCADE.

List of Keys and their Bindings in cdl Mode

|C-c |Command prefix | |TAB | cdl-tab | |DEL | backward-delete-character-untabify | |ESC | Command prefix | |C-c C-x | cdl-new-exception | |C-c C-e | cdl-new-enumeration | |C-c C-b | cdl-new-buffer | |C-c C-p | cdl-new-package | |C-c C-r | cdl-new-rubric | |C-c C-c | cdl-new-class | |C-c f | cdl-fill-mode | |C-c s | cdl-structure | |C-c t | cdl-tabsize | |C-c e | cdl-comment-end | |ESC k | cdl-find-class | |ESC q | cdl-comment-fill | |ESC TAB | cdl-untab | |ESC-RET | cdl-raw-newline |

Appendix B. Parameters and EDL Files

EDL language

Key Concepts

EDL is a script-like programming language.

Comment - text, preceded by two hyphens.

-- Comment text....
  • Identifier - any combination of characters in the ranges A-Z, az, 0-9 and _ (underscore).
  • Variable - an identifier preceded by % (percent sign).
  • Actions The following actions are available:
    \@string
    \@set
    \@apply
  • Execution @uses is an execution operator.
  • Input/Output The following input/output operators are provided:
    \@file
    \@write
    \@close
    \@cout
  • Conditional Operators The following conditional operators are provided:
    \@iffile
    \@ifdefined
    \@ifnotdefined
    \@ifnotfile
    \@if
    then
    \@else
    \@endif
  • Operators The following operators are available:

!= || && file notfile defined notdefined

Templates The following template commands/keywords are available:

\@template
is
\@end
\@addtotemplate
\@cleartemplate

Miscellaneous The following miscellaneous commands exist:

\@verboseon
\@verboseoff

Syntax

The following conventions are used in the explanations below:

| *<Variable>* | refers to a variable, for example: *myvariable* | | *<Id>* | refers to an identifier, for example: myidentifier | | *“String”* | refers to a string of characters, for example: *“my string of characters”* | | *<Condition>* | refers to a condition, for example: *(mytest == “ok”) || (mytest == “good”)* | | *<Template>* | refers to the name of a template, for example: mytemplate. | |{} | indicates possible repetition of what is within the curly brackets. |

EDL Actions

@string

\@string <Variable> = {<Variable> or “String”} ;
\@string <Variable> += {<Variable> or “String”} ;

Concatenates the contents of the variables and strings on the right of the equals sign and assigns the result to the variable situated on the left. Using the operator ‘+=’ instead of ‘=’ adds the concatenation to the current contents of the variable on the left.

@set

\@set <Variable> = “ String” ;

Sets <Variable> to the value “String”

@apply

\@apply <Variable> = <Template> ;

Evaluates the template, <Template>, and sets <Variable> equal to this.

@uses

\@uses <Variable>;
\@uses “ String”;

Runs an EDL file. The name of this file is either contained in the variable <Variable> or is given as a string, <String>.

@file

\@file <Id> <Variable> ;
\@file <Id> “String” ;

Opens a file and associates it with the identifier <Id>. This <Id> identifies the file until it is closed. The name of the file is given as a string <String>, or using a variable <Variable>.

@write

\@write <Id> <Variable> ;

Writes the contents of the variable out to a file indicated by the file <Id>. This <Id> is the identifier allocated to the file when is opened using @file.

@close

\@close <Id> ;

Closes the file identified by <Id>. This <Id> is the identifier allocated to the file when is opened using @file.

@cout

\@cout {<Variable> or “String”} ;

Concatenates the contents of the variables and strings and displays the result on standard out.

@iffile

\@iffile ( <Variable> or “String”) then
\@endif ;
\@iffile ( <Variable> or “String”) then
\@else
\@endif ;

Checks for the existence of a file, the name of which is given in the string ‘String”, or else contained in the variable <Variable>. If the file exists, the instructions contained in the ‘then’ loop are executed up to the *@endif*, (or an @else if one is found before the @endif ). If the files do not exist, the ‘else’ loop is executed (if one exists).

@ifnotfile

\@ifnotfile ( <Variable> or “String”) then
\@endif ;
\@ifnotfile ( <Variable> or “String”) then
\@else
\@endif ;

Checks for the existence of a file, the name of which is given in the string ‘String”, or else contained in the variable <Variable>. If the file does not exist, the instructions contained in the ‘then’ loop are executed up to the @endif, (or an @else if one is found before the @endif). If the file does exist, the ‘else’ loop is executed (if one exists).

@ifdefined

\@ifnotdefined ( <Variable> or <Template>) then
\@endif ;
\@ifnotdefined ( <Variable> or <Template>) then
\@else
\@endif ;

Checks for the existence of a variable or template, the name of which is given by <Template>, or else contained in the variable <Variable>. If a variable or a template by this name exists the instructions contained in the ‘then’ loop are executed up to the @endif, (or an @else if one is found before the @endif). If neither a variable nor a template exists, the ‘else’ loop is executed (if one exists).

@ifnotdefined

\@ifnotdefined ( <Variable> or <Template>) then
\@endif ;
\@ifnotdefined ( <Variable> or <Template>) then
\@else
\@endif ;

Checks for the existence of a variable or template, the name of which is given by <Template>, or else contained in the variable <Variable>. If neither a variable nor a template by this name exists the instructions contained in the ‘then’ loop are executed up to the @endif, (or an @else if one is found before the @endif). If a variable or a template does exist, the ‘else’ loop is executed (if one exists).

@if

\@if (<Condition>) then
\@endif ;
\@if (<Condition>) then
\@else
\@endif ;

Tests a condition. If the condition is true the instructions in the ‘then’ loop are executed up to the @endif, (or an @else if one is found before the @endif). If the condition is false, the ‘else’ loop is executed (if one exists).

@template

\@template <Template> (<Variable>, ... , <Variable>) is
$ text...
.
.
$ text...
\@end;

Creates a template, which is a definition that contains variables. The variables on which a template relies are given in parentheses, following the name of the template. These variables are used to evaluate the template, and are referred to as ‘variables of evaluation’. When a template is evaluated (see @apply) the variables in its definition are replaced by the current values of the ‘variables of evaluation’. A template is re-evaluated each time it is used.

@addtotemplate

\@addtotemplate <Template> is
$ text
.
.
$ text
\@end;

Adds the specified lines to an existing template.

@cleartemplate

\@cleartemplate <Template> ;

Removes all the lines of a template.

@verboseon

\@verboseon ;

Turns on the verbose mode, such that lines of text are displayed on standard out when you run EDL files.

@verboseoff

\@verboseoff ;

Turns off the verbose mode, such that lines of text are not displayed on standard out when you run EDL files.

EDL Conditions

Conditions are used with *@if* commands. Complex and simple conditions are available. The syntax is similar to C++.

Simple Conditions

Simple conditions test for equality, the existence of a particular file and so on. The general format is:

\@if(<Condition>) then
...

The syntax of simple conditions is given below.

<Variable> == “String” -- (equals)
<Variable> != “String” -- (does not equal)
defined(<Variable>) -- (see \@ifdefined)
defined(<Template>) -- (see \@ifdefined)
notdefined(<Variable>) -- (see \@ifnotdefined)
notdefined(<Template>) -- (see \@ifnotdefined)
file(<Variable>) -- (see \@iffile)
file(“String”) -- (see \@iffile)
notfile(<Variable>) -- (see \@ifnotfile)
notfile(“String”) -- (see \@ifnotfile)

Complex conditions

Complex conditions take into account the results of other conditions. Complex conditions use the operators || (logical OR) or the operator (logical AND). There are no restrictions on the formulation of these conditions: * (Simple condition) operator (Simple condition) * (Complex condition) operator (Simple condition) * (Simple condition) operator (Complex condition) * (Complex condition) operator (Complex condition)

For example,

\@if ((%a == “0” && %b == “1” && %c == “1”) || %d == “1” && ((%a == “1”) && %b == “1”)) then
\@cout “CONDITION TRUE”;
\@else
\@cout “CONDITION FALSE”;
\@endif;

WOK Parameters

WOK parameters are defined using EDL. There are two types of EDL parameters: Variables and Templates.

Variables have a ‘fixed’ value. By contrast a template relies on the values of other variables, and must re-evaluate itself each time it is used.

Classes of WOK Parameters

WOK parameters are grouped according to their class. The following classes exist: | CODEGEN  | Code generator options, for example options for lex and yacc. | | CMPLRS   | Compiler options. | | LDAR     | Archive creation options. | | ARX      | Archive extraction options. | | LDEXE    | Executable linker options. | | LDSHR    |  Shared linker options. |

Defining WOK Parameters

The WOK distribution includes a base configuration for each class of parameters. This base configuration is provided in the form of EDL files, one file per a class of parameters. Each file is named according to the parameter class:

<ParamClassName>.edl

This configuration file sets the values of all the parameters in the class.

For example, consider a parameter class FOO. There are two variable parameters in this class: FOO_Shared and FOO_Name. These two parameters are assigned a value in the FOO.edl file. The file is given as an example below:

-- standard protection against multiple execution
\@ifnotdefined ( %FOO_EDL) then
\@set %FOO_EDL = **;
-- set %FOO_Shared according to the platform
\@if ( %LocalArch != *hp* ) then
\@set %FOO_Shared = *libCPPExt.so*;
\@endif;
\@if ( %LocalArch == *hp* ) then
\@set %FOO_Shared = *libCPPExt.sl*;
\@endif;
-- set the FOO_Name parameter to FOO
\@set %FOO_Name = *FOO*;
\@endif;

Note that all the parameters in a class take the name of the class as a prefix to their own name. Parameters of type variable are also prefixed by % (percent symbol):

%ClassName_VariableParamName
ClassName_TemplateParamName

A simplified template definition is given as an example below. This definition is based on the FOO parameters set in the previous example above.

Let us define the variable parameter(s) to be used in the template and then the template itself:

\@set %FOO_Shared = *libCPPExt.so*;
\@set %FOO_Name = *FOO*;
\@template FOO_Load ( %FOO_Shared, %FOO_Name) is
$ %FOO_Load_%FOO_Shared %FOO_Name
\@end;

Redefining Parameters

Occasionally you may want to redefine WOK parameters. For example, you can change the compiler options to force ANSI mode compilation, or redefine how external libraries are referenced. Before redefining anything, decide on the scope of the redefinition. Is the redefinition to apply to the whole factory, a single workshop, a workbench, or just a development unit? In some cases you may want to redefine parameters within a delivery unit, so that a parcel is delivered with particular options.

The order in which redefinitions are applied (order of precedence) may mean your options are overwritten by subsequent redefinitions.

Redefinition Files

Each entity can have an associated redefinition file for each class of parameters. A redefinition file is an EDL file. It always takes the name of the entity to which it belongs, followed by the name of the class of parameters that it applies to:

<EntityName>_<ParamClassName>.edl

For example, the file MyFactory_CMPLRS.edl redefines one of more of the parameters in the CMPLRS class. The scope of this redefinition is MyFactory. To be taken into account by WOK, this redefinition file must be created in the administration directory of the entity to which it belongs. To find out the pathname of this directory, use the command:

wokinfo -p admfile:<EntityName>_<ParamClassName>.edl <EntityPath>

To test whether the file exists actually, use the command:

wokinfo -p adminfile:WOK_LDAR.edl WOK=> /adv22/wok/adm

There is one exception to this rule for file placement. For a development unit, the redefinition file is treated as a *source *file, and consequently it must be located in the src directory of the unit. To find out the path of this directory, use the command:

wokinfo -p source:<UnitName>_<ParamClassName>.edl <UnitPath>

One of the most common reasons to redefine WOK parameters is to modify compiler options. To do this, for example to add a compile option to the package MyPack:

  • In the source directory of MyPk, create file MyPk_CMPLRS.edl
  • In this file add the definition:
    \@string %CMPLRS_CXX_Options += * -DMyDefine=string *;

Order of Precedence for Parameter Redefinitions

WOK takes parameter (re)definitions into account in the following order.

  • WOK
  • Factory
  • Workshop
  • Parcels (within the Workshop configuration, in the order in which they are declared in the parcel configuration).
  • Workbench (in order of inheritance)
  • Development unit WOK provides commands to find out what parameter definitions (and redefinitions) are used, and in what order. You can see what compiler parameters are used by WOK in CMPLRS.edl file. To find this file, use the command:
    wokparam -S CMPLRS.edl
    Then run the command.
    wokparam -F CMPLRS EntityPath
    This command displays a list of all the definition files, for parameters of type compiler, that are taken into account for EntityPath. These file are listed in the order in which they are taken into account. The last definition is the one that is used.

Using EDL to Define WOK Parameters

Modification of Link Options - Example

How to add a define to the compilation

To add a define for all C++ files compiled in the package MyPackage, MyPackage_CMPLRS.edl is declared in the development unit MyPackage This file contains:

\@string %CMPLRS_CXX_Options =
%CMPLRS_CXX_Options * -DMYDEFINE*;

How to use a code generator

In this example, a C code generator is used, which takes the input <file>.mygen and generates a <file>.c. The step obj.cgen automatically recognizes all files with the extension mygen and uses the generator on these files. The resulting .c files are compiled by the step obj.comp. The file MyUnit_CODEGEN.edl is written in a nocdlpack development unit MyUnit. This file contains the following code:

-- list of tools recognized by the step obj.cgen
-- the tool MYGEN is added
\@ string %CODEGEN_Tools = %CODEGEN_Tools * CODEGEN_MYGEN*;
-- the tool MYGEN is called via the template CODEGEN_MYGEN_CmdLine
\@set %CODEGEN_MYGEN_Template = *CODEGEN_MYGEN_CmdLine*;
-- the extension of files processed by MYGEN is mygen
\@set %CODEGEN_MYGEN_Extensions = *foo.mygen*;
-- the tool MYGEN is the executable /usr/local/bin/mygen
\@set %CODEGEN_MYGEN_Tool = * /usr/local/bin/mygen*;
-- the tool MYGEN produces a .c file
\@template CODEGEN_MYGEN_Production ( %BaseName ) is
$%BaseName.c
\@end;
-- the command executed to construct the .c file is:
\@template CODEGEN_MYGEN_CmdLine ( %CODEGEN_MYGEN_Tool,
%Source, %BaseName, %OutputDir ) is
$cd %OutputDir
$%CODEGEN_MYGEN_Tool -f %Source -o %BaseName.c
\@end;

Appendix C. Tcl

Tcl Overview

Tcl stands for ‘‘tool command language* and is pronounced ‘‘tickle*. It is actually two things: a language and a library.

As a simple textual language, tcl is intended primarily for issuing commands to interactive programs such as text editors, debuggers, illustrators, and shells. It has a simple syntax and is also programmable, so tcl users can write command procedures to provide more powerful commands than those in the built-in set.

As a library package, tcl can be embedded in application programs. The tcl library consists of a parser for the cl language, routines to implement the tcl builtin commands, and procedures that allow each application to extend tcl with additional commands specific to that application. The application program generates tcl commands and passes them to the tcl parser for execution. Commands may be generated by reading characters from an input source, or by associating command strings with elements of the application's user interface, such as menu entries, buttons, or keystrokes.

Download Tcltk 8.5 or 8.6 from http://www.tcl.tk/software/tcltk/8.6.html

A help application, tclhelp, is also provided with tcl and can be activated by command tclhelp.

Tcl and WOK

The tcl interpreter offers WOK the following advantages:

  • an environment in which both WOK and UNIX commands are available,
  • dynamic loading of WOK as it is needed,
  • a high performance portable environment, in which the user can write customized procedures.

The following tcl commands are most commonly used with WOK: expr, foreach, glob, if, package, proc, puts, set, source and unlink.

Refer to the tcl documentation, or the tcl help application, for details of these and other tcl commands.

Configuring Your Account for Tcl and WOK

To have access to WOK you must modify the configuration files of your account as described below.

The cshrc File

To allow the C shell session to configure tcl add the following line to your .chsrc file:

source/<sun|ao1|sgi|hp>_SYSTEM/util_LOG/cshrc_TCL

To configure your account to allow access to WOK add the following line to your .cshrc file:

if(!$?WOKHOME) then
setenv WOKHOME /YOURCONTAINER/wok-<version of wok>
source /<sun|ao1|sgi|hp>_SYSTEM/util_LOG/cshrc_Wok

The tclshrc File

To enable configuration of the tcl interpreter, add the following line to your .tclshrc if it exists (if not create one):

source $env(WOKHOME)/site/tclshrc_Wok

The WOK_SESSIONID Variable

The WOK_SESSIONID environment variable ensures that you start a new WOK session in the same state and with the same parameter values as your previous WOK session. This continuity is provided by using the same WOK_SESSIONID. Note that your WOK_SESSIONID does not change, unless you change it manually.

Make sure that WOK_SESSIONID points to (a subdirectory of) your home directory.

Writing Tcl Steps for a WOK Build

There are three advanced WOK commands available for writing umake steps in tcl:

  • msgprint
  • stepoutputadd
  • stepaddexecdepitem

msgprint [-i|-w|-e|-v|-V Class] prints a message. The output is directed to a WOK internal process that is in charge of printing messages.

The following options are available: | -i   | Prints an information message. | | -w   | Prints a warning message. | | -e   | Prints an error message. | | -v   | Prints a verbose message. | | -V<Class> | Prints a verbose message for class <Class>. | | -c   | Prints context of message, i.e. the procedure that called it. |

For example,

msgprint -e -c *CCLKernel_GetObjects\::Execute* *Cannot locate object file : * $file;

Writes an error message, in format:

ERROR: CCLKernel_GetObjects\::Execute - Cannot locate object file : MyFile

stepoutputadd <options> <OutputFileID> [<filepath>] adds an output file to the outputs of the step. This file is treated by subsequent steps in the same way as all the other output files of the step. The following options are available:

| -p<path> | Specifies the path where the file is located. | | -L | Output can be located (default). | | -N | Not a WOK file. Cannot be located. | | -F | Physical file (i.e. resides on a disk somewhere). | | -M | File is a member of the unit being built (default). | | -X | File is not a member of the unit being built. Not a WOK file. Cannot be located. | | -P | File is produced by this umake step (i.e. WOK can delete it because it will be regenerated). | | -R | File is not produced by this umake step (i.e. WOK must not delete it because it can not be regenerated). | -S<StepID> | Reserved for advanced use. Specifies stepID. | | -V | Reserved for advanced use. Virtual ‘file’ (i.e. an MSEntity). This option is used for passing keywords between steps for example. |

For example,

stepoutputadd -X -R -N -F /usr/myfiles/res.o -p /usr/myfiles/res.o

Adds the file */usr/myfiles/res.o* to the outputs of this step. Specifies that this file is not a WOK file, cannot be located automatically by WOK, and is not generated by this step. Here the full file path is used as the unique file identifier. This appears to be duplicated when it is also given as the physical location of the file.

stepaddexecdepitem <options> <InputFileID> <OutputFileID> adds a dependency between one file and another. Typically when introducing external object libraries the files are set to be dependent on the CDL file. We do this because the CDL file changes rarely, so the external files are not needlessly reprocessed, but they are always included in the final executable. The following options are available:

| -d  | Adds a direct dependency (default). | | -i  | Adds an indirect dependency. |

For example,

stepaddexecdepitem -d MyInFile MyOutFile

States that the file MyOutFile depends directly on the file MyInFile.

Components of a Tcl UMake Step

Each tcl umake step has the following components:

  • HandleInputFile - a filter: for each input file this component decides whether or not to accept the file.
  • OutputDirTypeName returns one of three strings, according to the dependency of the file:
    • tmpfile = the file is independent (i.e. dependent only on its source);
    • dbtmpdir = the file is dependent on the database profile;
    • sttmpdir = the file is dependent on the station profile.
  • AdmFileType returns one of three strings, according to the dependency of the file:
    • admfile = the file is independent (i.e. dependent only on its source);
    • Dbadmfile = the file is dependent on the database profile;
    • stadmfile = the file is dependent on the station profile.

Execute processes each input file that is out of date (i.e. has changed since it was last processed, or depends on a file that has changed since it was last processed). Typically this procedure takes the form of a foreach loop. Argument: a development unit to process and a list of one or more arguments.

Sample Tcl Steps

Sample 1

# CCLKernel_GetObjects.tcl
proc CCLKernel_GetObjects::AdmFileType {} {
return stadmfile;
}
proc CCLKernel_GetObjects::OutputDirTypeName {} {
return sttmpdir;
}
proc CCLKernel_GetObjects::HandleInputFile { ID } {
scan $ID *%\[^:\]:%\[^:\]:%\[^:\]* unit type name
return 1;
switch [file extension $name] {
.cdl {
return 1;
}
default {
return 0;
}
}
}
proc CCLKernel_GetObjects\::Execute { unit args } {
msgprint -i -c *CCLKernel_GetObjects\::Execute*
*Processing unit : $unit*;
msgprint -i -c *CCLKernel_GetObjects\::Execute*
set failed 0;
set inid [lindex $args 0]
foreach file { Frontal_Ccal_Init_Request.o Frontal_Ccal_Send_Request.o \ Frontal_Ccal_sd.o Frontal_Get_Response.o Frontal_Ccal_Connect.o } {
set resid *Frontal:object:$file*
set path [woklocate -p $resid]
if { $path == ** } {
msgprint -e -c *CCLKernel_GetObjects\::Execute*
*Cannot locate object file : * $file;
set failed 1;
} else {
msgprint -i -c *CCLKernel_GetObjects\::Execute* *Add
object $file at * $path
stepoutputadd -X -R -L -F $resid
stepaddexecdepitem -d $inid $resid
}
}
if { [wokparam -e %Station] == *sun* } {
set file *risc_return.o*
set resid *CCLKernel:source:$file*
set path [woklocate -p $resid]
## set path */adv_23/wb/kl/Kernel7/prod/EngineStarter/
src/risc_return.o*
msgprint -i -c *CCLKernel_GetObjects\::Execute* *Add
object $file at * $path
stepoutputadd -X -R -N -F $path -p $path
stepaddexecdepitem -d $inid $path
}
set home [wokparam -e %Ilog_Home]
if { $home == ** } {
msprint -c *CCLKernel_GetObjects\::Execute* -e *Cannot
evaluate parameter : %Ilog_Home
return 1;
}
foreach file { llstdio.o llfloat.o llfloat31.o cfix.o
lelisp.o getgloba.o cload.o } {
set path *$home/o/$file*
msgprint -i -c *CCLKernel_GetObjects\::Execute* *Add
object $file at * $path
stepoutputadd -X -R -N -F $path -p $path
stepaddexecdepitem -d $inid $path
}
set file *lelisp31bin.o*
set path *$home/lelisp31bin.o*
msgprint -i -c *CCLKernel_GetObjects\::Execute* *Add
object $file at * $path
stepoutputadd -X -R -N -F $path -p $path
stepaddexecdepitem -d $inid $path
if { $failed } {return 1;}
return 0;
}

Sample 2

File Name: CCLKernel_core.tcl

proc CCLKernel_core::AdmFileType {} { return stadmfile; } proc CCLKernel_core::OutputDirTypeName {} { return sttmpdir; } proc CCLKernel_core::HandleInputFile { ID } { scan $ID *%[^:]:%[^:]:%[^:]* unit type name switch $type { executable { return 1; } } switch $name { CCL_lelisp.ll { return 1; } } return 0; } proc CCLKernel_core::Execute { unit args } { global WOK_GLOBALS env msgprint -i -c CCLKernel_core::Execute Processing unit : $unit; msgprint -i -c CCLKernel_core::Execute set workbench [wokinfo -N $unit] set unitname [wokinfo -n $unit] set failed 0; set lispbin ** set lispfile ** set lispbinid ** set lispfileid ** foreach ID $args { scan $ID *%[^:]:%[^:]:%[^:]* Unit type name switch $type { executable { set lispbinid $ID set lispbin [stepinputinfo -p $ID] } } switch $name { CCL_lelisp.ll { set lispfileid $ID set lispfile [stepinputinfo -p $ID] } } } if { $lispfile == **} { set lispfileid CCLKernel:source:CCL_lelisp.ll; set lispfile [woklocate -p $lispfileid $workbench] } if { $lispbin == **} { msgprint -e -c CCLKernel_core::Execute Cannot find lelispbin in input return 1; } msgprint -i -c CCLKernel_core::Execute Using lelisp.bin at * $lispbin msgprint -i -c *CCLKernel_core::Execute set config *[wokparam -e Ilog_Home]/config* set tmpdir [wokinfo -p sttmpdir:. $unit] set output [wokinfo -p executable:. $unit] set lelisppointbin [wokinfo -p executable:lelisp.bin $unit] unlink -nocomplain $lelisppointbin link -sym $lispbin $lelisppointbin msgprint -i -c CCLKernel_core::Execute Setting Environment set WOK_GLOBALS(setenv_proc,tcl) 1 wokenv -s set WOK_GLOBALS(setenv_proc,tcl) 0 set olddir [pwd] cd [wokinfo -p source:. $unit] set FrontSIZE *-stack 12 -code 1500 -heap 2048 -number 0 -vector 32 -string 50 -symbol 30 -float 0 -cons * msgprint -i -c CCLKernel_core::Execute Exec : $config $tmpdir $lispbin $lispfile $output $FrontSIZE 8 puts exec /bin/env \ COREDIR=$output \ WBPACKAGE=[wokinfo -n $unit] ILOG_LICENSE_FILE=[wokparam -e Ilog_LicenseFile] \ CSF_EngineStarterList=/usr/local/etc/ EngineStarter.Hosts \ ILOG_LICENSE_FILE=[wokparam -e Ilog_LicenseFile] \ *FrontSIZE=$FrontSIZE* \ $config $tmpdir $lispbin $lispfile $output $FrontSIZE 8 msgprint -i -c CCLKernel_core::Execute [eval exec /bin/env \ COREDIR=$output \ WBPACKAGE=[wokinfo -n $unit] \ ILOG_LICENSE_FILE=[wokparam -e Ilog_LicenseFile] \ CSF_EngineStarterList=/usr/local/etc/ EngineStarter.Hosts \ *FrontSIZE=$FrontSIZE* \ $config $tmpdir $lispbin $lispfile $output $FrontSIZE 8] stepoutputadd -P

unitname:
orelisp:

unitname.core stepaddexecdepitem -d $lispbinid

unitname:
orelisp:

unitname.core stepaddexecdepitem -d $lispfileid

unitname:
orelisp:

unitname.core cd $olddir return 0; } ~~~~~