|
Open CASCADE Technology
6.9.1
|
|
|
Open CASCADE Technology
6.9.1
|
|
This document provides practical guidelines for generation and editing of OCCT user documentation.
You need to have the following software installed to generate the documentation.
Tcl/Tk Version 8.5 or 8.6: http://www.tcl.tk/software/tcltk/download.html
Doxygen Version 1.8.4 or above: http://www.stack.nl/~dimitri/doxygen/download.html
Dot Part of Graphviz software, used by Doxygen for generation of class diagrams in Reference Manual: http://www.graphviz.org/Download..php
MiKTeX or other package providing pdflatex command (only needed for generation of PDF documents): http://miktex.org/download
Inkscape (only needed for generation of PDF documents containing SVG images): http://www.inkscape.org/download
When generating PDF documentation, pdflatex and inkscape executables should be accessible by PATH variable. You can use custom.bat file to add necessary paths to the PATH variable.
Note that in the process of PDF generation MiKTeX may need some packages not installed by default. We recommend setting option "Install missing packages on-the-fly" to "Ask me first" (default) during MiKTeX installation:
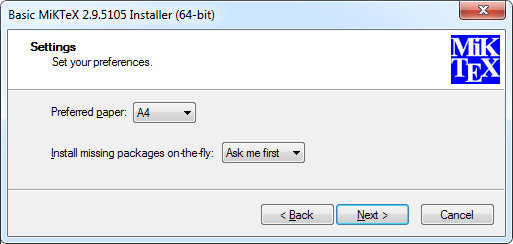
On the first run of pdflatex it will open a dialog window prompting for installation of missing packages. Follow the instructions to proceed (define proxy settings if needed, select a mirror site to download from, etc.).
MathJax is used for rendering math formulas in browser (HTML and CHM outputs): http://www.mathjax.org.
By default MathJAX scripts and fonts are taken from http://cdn.mathjax.org/mathjax/latest and no installation of MathJAX is necessary if Internet is accessible. If you need to use OCCT documentation while off-line, you can install a local copy of MatJAX, see http://www.mathjax.org/download/. See Formulas for more details on inserting mathematical expressions.
Run command gendoc from command prompt (with OCCT directory as current one) to generate OCCT documentation. The synopsis is:
gendoc \[-h\] {-refman|-overview} \[-html|-pdf|-chm\] \[-m=<list of modules>|-ug=<list of docs>\] \[-v\] \[-s=<search_mode>\] \[-mathjax=<path>\]
Here the options are:
Note
Examples
To generate the output for a specific document specify the path to the corresponding MarkDown file (paths relative to dox sub-folder can be given), for instance:
To generate Reference Manual for the whole Open CASCADE Technology library, run:
To generate Reference Manual for Foundation Classes and Modeling Data modules only, with search option, run:
This section contains information about file format conventions, directories structure, etc.
The format used for documentation is MarkDown with Doxygen extensions. The MarkDown files have a *.md extension and are based on rules described in Appendix 1: Document Syntax section.
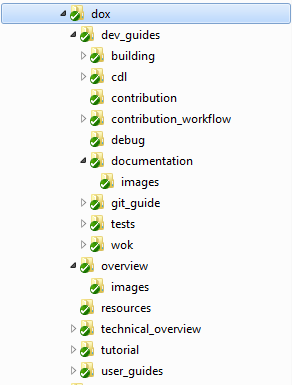
Each document has its own folder if there are any images used in it. These images are stored in images subfolder.
If you want to use the same image for several documents, you can place it in dox/resources folder.
Note: To avoid incorrect image display, use a relative path to the image (starting from dox folder). For instance:
@figure{/dev_guides/documentation/images/documentation_test_image.svg}
The documentation is generated in subfolder doc :
Place a new document in the folder taking into account its logical position in the documentation hierarchy. For instance, the document svn.md about the use of SVN to work with OCCT source code can be placed into /dox/dev_guides/.
If there are images in the document, it should be placed in its own folder containing a subfolder for images. For instance:
Add a relative path to svn.md in file dox/FILES.txt. For instance
dev_guides/svn/svn.md
Note that the order of paths to documents in FILES.txt is reproduced in the Table of Contents in the HTML output. Please, place them logically.
Note that you should specify a file tag, not the document name. See Header section for details.
More information about OCCT can be found at http://www.opencascade.com and http://dev.opencascade.org sites.
The information on formula syntax can be found at: http://en.wikipedia.org/wiki/Help:Displaying_a_formula
More information on MarkDown and Doxygen syntax can be found at: http://www.stack.nl/~dimitri/doxygen/manual
A document file in *.md format must start with a proper header defining a caption and a unique tag.
Documentation System {#dev_guides__documentation}
=====================
The document structure is formed by sections that must be defined consistently.
The document can contain plain text, lists, tables, code snippets, images, math, etc. Any specific text elements can be introduced by Markdown language tags or by usual HTML tags.
The table of contents, page numbers (in PDF), and figure numbers (in PDF) are generated automatically.
Headers of different levels can be specified with the following tags:
For example:
  @section occt_ocaf_1 Basic Concepts
  @subsection occt_ocaf_1_1 Applications and Documents
  @subsubsection occt_ocaf_1_1_1 The document and the data framework
Please, note that section names can be used for references within the document and in other documents, so it is necessary to use the common prefix indicative of the document name for all section names in the given document. For example, occt_ocaf for sections in Open CASCADE Application Framework manual.
The remaining part of section names in most documents consists only of numbers, for example 1_1. Actually, the hierarchical structure of the output table of contents is not based on these numbers and is generated automatically.
The numbers are only indicative of a section location in the body of the document. However, duplicate section names in a document inevitably cause errors during generation.
If you insert a section in the middle of a big document, do not renumber the document to the end (which is inefficient and error prone), but choose an arbitrary number or letter, not yet used in the document section naming, and base the naming in this section on it.
The section hierarchy is limited to three levels and further levels cannot be presented in the Table of Contents.
However, the fourth and fifth level headers can be tagged with #### and ##### correspondingly.
It is also possible to use tags ## and ### for second and third level headers if you do not wish to show them in the table of contents or make references to them.
A plain text is organized in paragraphs, separated by empty lines in MarkDown source. The length of lines is not restricted; it is recommended to put each sentence on a separate line – this is optimal for easier comparison of different versions of the same document.
To insert special symbols, like < , > or \, prepend them with \ character: \<, \>, \\, etc. To emphasize a word or a group of words, wrap the text with one pair of asterisks (*) or underscores (_) to make it italic and two pairs of these symbols to make it Bold.
Note that if your emphasized text starts or ends with a special symbol, the asterisks may not work. Use explicit HTML tags <i></i> and <b></b> instead.
To create a bulleted list, start each line with a hyphen or an asterisk, followed by a space. List items can be nested. This code:
* Bullet 1
* Bullet 2
  - Bullet 2a
  - Bullet 2b
* Bullet 3
produces this list:
To create a numbered list, start each line with number and a period, then a space. Numbered lists can also be nested. Thus this code
1. List item 1
   1. Sub-item 1
   2. Sub-item 2
2. List item 2
4. List item 3
produces this list:
Note that numbers of list items in the output are generated so they do not necessarily follow the numbering of source items.
In some cases automatic generation adversely restarts the numbering, i.e. you get list items 1. 1. 1. instead of 1. 2. 3. in the output. The use of explicit HTML tags <ol></ol> and <li></li> can help in this case.
Each list item can contain several paragraphs of text; these paragraphs must have the same indentation as text after bullet or number in the numbered list item (otherwise numbering will be broken).
Code blocks can be inserted as paragraphs with additional indentation (4 spaces more). Note that fenced code blocks do not work within numbered lists and their use may cause numeration to be reset.
Example of a complex nested list:
List item 1
Additional paragraph
code fragment
One more paragraph
code fragment for sub-item 1
Sub-item 2
Paragraph for sub-item 2
Yet one more paragraph for list item 1
A table consists of a header line, a separator line, and at least one row line. Table columns are separated by the pipe (|) character. The following example:
First Header  | Second Header
------------- | -------------
Content Cell  | Content Cell
Content Cell  | Content Cell
will produce the following table:
| First Header | Second Header |
|---|---|
| Content Cell | Content Cell |
| Content Cell | Content Cell |
Column alignment can be controlled via one or two colons at the header separator line:
| Right | Center | Left  |
| ----: | :----: | :---- |
| 10    | 10     | 10    |
| 1000  | 1000   | 1000  |
which will looks as follows:
| Right | Center | Left |
|---|---|---|
| 10 | 10 | 10 |
| 1000 | 1000 | 1000 |
Note that each table row should be contained in one line of text; complex tables can be created using HTML tags.
Paragraphs indented with 4 or more spaces are considered as code fragments and rendered using Courier font. Example:
This line is indented by 4 spaces and rendered as a code block.
A fenced code block does not require indentation, and is defined by a pair of "fence lines". Such line consists of 3 or more tilde (~) characters on a line. The end of the block should have the same number of tildes. Thus it is strongly advised to use only three or four tildes.
By default the output is the same as for a normal code block. To highlight the code, the developer has to indicate the typical file extension, which corresponds to the programming language, after the opening fence. For highlighting according to the C++ language, for instance, write the following code (the curly braces and dot are optional):
~~~{.cpp}
int func(int a,int b) { return a*b; }
~~~
which will produce:
Smaller code blocks can be inserted by wrapping with tags @code and @endcode.
Verbatim content (same as code but without syntax highlighting) can be inserted by wrapping with tags @verbatim and @endverbatim.
To insert a reference to a website, it is sufficient to write an URL. For example: http://en.wikipedia.org
To insert a reference to a document or its subsection, use command @ref followed by the document or section tag name. For instance,
will be rendered as Appendix 1: Document Syntax.
Note that links between documents will not work in PDF output if each document is generated independently. Hence it is recommended to add a name of the referenced section after the tag name in the @ref command (in quotes): this will guarantee that the reference is recognizable for the reader even if the cross-link is not instantiated. For instance:
will be rendered as Geometry Utilities.
For inserting images into the document use the command @figure, as follows:
@figure{/relative/path/to/image/image_file_name.png,"Image caption"}
The first argument is a path to the image file, relative to the dox folder. The supported formats for images are PNG, JPG, and SVG. The file extension must be lowercase and correspond to the file format. The image file name should have no dots except for the one before extension (names with more than one dot confuse pdflatex).
The second argument is optional, it defines the caption for the image to be inserted. The caption argument, if given, should be quoted, even if it is a single word. Captions are included below the image; in PDF output the images with caption are numbered automatically.
Example:
@figure{/dev_guides/documentation/images/documentation_test_image.svg,"Test SVG image"}
is rendered as:

We recommend using Inkscape for creation and edition of vector graphics. The graphics created in MS Word Draw and some other vector editors can be copy-pasted to Inkscape and saved as SVG images.
Note that the image that will be included in documentation is the whole page of the Inkscape document; use option "Resize page to content" in menu File -> Document properties of Inkscape to fit page dimensions to the picture (adding margins as necessary).
Note that the figure command is an alias to the standard Doxygen command image repeated twice: once for HTML and then for Latex output (used for PDF generation). Thus if HTML and PDF outputs should include different images or captions, command "image" can be used:
  @image html /relative/path/to/image/occ_logo.png
  @image latex /relative/path/to/image/occ_logo.png "OCC logo"
Use @tableofcontents tag to get the table of contents at the beginning of the document.
Actually, it is not strictly necessary now because TreeView option for HTML is used. The TOC in the PDF document will be generated automatically.
Formulas within MarkDown documents can be defined using LaTeX syntax.
Equations can be written by several ways:
1.Unnumbered displayed formulas that are centered on a separate line. These formulas should be put between @f[ and @f] tags. An example:
@f[
    |I_2|=\left| \int_{0}^T \psi(t)
            \left\{
                u(a,t)-
                \int_{\gamma(t)}^a
                \frac{d\theta}{k(\theta,t)}
                \int_{a}^\theta c(\xi)u_t(\xi,t)\,d\xi
            \right\} dt
        \right|
@f]
gives the following result:
\( |I_2|=\left| \int_{0}^T \psi(t) \left\{ u(a,t)- \int_{\gamma(t)}^a \frac{d\theta}{k(\theta,t)} \int_{a}^\theta c(\xi)u_t(\xi,t)\,d\xi \right\} dt \right| \)
2.Formulas can also be put between
\begin{align} and
\end{align} tags.
For example:
  \begin{align}
  \dot{x} & = \sigma(y-x) \\
  \dot{y} & = \rho x - y - xz \\
  \dot{z} & = -\beta z + xy
  \end{align}
gives the following result: \begin{align} \dot{x} & = \sigma(y-x) \\ \dot{y} & = \rho x - y - xz \\ \dot{z} & = -\beta z + xy \end{align}
3.Inline formulas can be specified using this syntax:
@f$ \sqrt{3x-1}+(1+x)^2 @f$
that leads to the following result: \( \sqrt{3x-1}+(1+x)^2 \)
 1.8.5
1.8.5